#javascript add rows to table dynamically
Explore tagged Tumblr posts
Visit Tumblr Blog
Explore Tumblr blogs with no restrictions, modern design and the best experience.
Last Seen Tumblr Blogs


Fun Fact
When “GIF” was named word of the year in 2012, Oxford Dictionaries U.S.A. credited Tumblr for pushing the word.
Text
How to dynamically add/remove table row in jquery with example
How to dynamically add/remove table row in jquery with example
In this article, we will learn about how we can add/remove table rows in jquery as well as we will remove the selected row. Believe me, removing table rows in jquery going to be so easy simple you will understand easily how to remove/add table rows in jquery. To achieve the add/remove table row in jquery, I have used two predefined jquery functions one is append() and the second is…

View On WordPress
#dynamically add/remove row in html table using jquery#dynamically add/remove rows in html table using jquery#dynamically add/remove rows in html table using php#dynamically addremove column in html table using jquery#dynamically addremove rows in html table using javascript#dynamically addremove rows in html table using jquery#dynamically addremove rows in html table using php#how to dynamically add/remove table rows using jquery#how to dynamically addremove table rows using jquery#how to sum values from table column and update when remove or add new row in jquery#javascript add rows to table dynamically#jquery add row to table after specific row#jquery add row to table dynamically jsfiddle#jquery delete table row by id
1 note
·
View note
Photo

Dynamically Add or Remove Table Row Using VueJS Demo: Tutorial: ... source
0 notes
Text
Something awesome - web research
In order to better understand web exploitation as a concept, I need to first gain a better understanding of how networks are structured, and how information is sent over the internet.

You can read the notes I’ve compiled below:
How does the Internet work?
Modern life would be very different without computer networks. Computer networks are generally made up of multiple computers that are all connected together to share data and resources. The computer network that we all know is The Internet, which specifically connects computers that use the Internet Protocol or ‘IP’.
This is what a basic computer network looks like:

In our diagram, we have two things labelled “end system”, where one is the client and one is the server. These are all called ‘nodes’. The way that these nodes are connected, are through the lines made through the ISP (Internet Service Provider) and the Router. You can imagine the router as a traffic signaller. This router has only one job - it makes sure that a message sent from a given computer arrives at the right destination computer.
Website Basics:
Information on the Internet is divided into different areas by websites. Websites are referred to by a ‘domain name’ (like google.com, facebook.com), and each web page is referred to by its URL or Uniform Resource Locator. A website is a collection of web pages - so a website would be like a house and each webpage would be a room inside the house.
A URL can be broken down into different sections. Some of these sections are essential, and some others are only optional. Let’s go through each one, and discuss what each section does using the following example URL:
http://www.example.com:80/path/to/myfile.html?key1=value1&key2=value2
Protocol:
This is the http:// part. A protocol is basically a set method for sending data around a computer network. Usually for websites it is the HTTP protocol or its secured version, HTTPS.
Domain Name
Something that you should be familiar with, this domain name is a way for humans to easily remember websites that they want to visit, rather than remembering an IP address.
Port
It indicates the technical "gate" used to access the resources on the web server. It is usually omitted if the web server uses the standard ports of the HTTP protocol (80 for HTTP and 443 for HTTPS) to grant access to its resources. Otherwise it is mandatory.
Path to File
/path/to/myfile.html is the path to the resource on the Web server. In the early days of the Web, a path like this represented a physical file location on the Web server.
Parameters
?key1=value1&key2=value2 are extra parameters provided to the Web server. Those parameters are a list of key/value pairs separated with the & symbol.
The Web server can use those parameters to do extra stuff before returning the resource.
Each Web server has its own rules regarding parameters, and the only reliable way to know if a specific Web server is handling parameters is by asking the Web server owner.
Have a full read here
Different parts of a website and how to mess with it:
The building blocks of websites are HTML, CSS and Javascript which are all different programming languages with their own set of rules that you have to learn. If we think of a website like a fancy birthday cake then:
HTML is the base of the cake - it’s the main body and content of the website
CSS is the icing and decorations on top of the cake - it makes the cake look pretty and distinguishes the cake from other similar cakes
Javascript are the candles and sparklers - in terms of a website, javascript lets you make dynamic and interactive web pages
Like we said before, HTML is the base of your cake. HTML describes the structure of a Web page and consists of a series of elements which are represented by things called tags. HTML elements basically tell the browser how to display the content
HTML:
Tags look something like this:
<tagname>content goes here...</tagname>
There are some basic tags:
<!DOCTYPE html> declaration defines this document to be HTML5
<html> element is the root element of an HTML page
<head> element contains meta information about the document
<title> element specifies a title for the document
<body> element contains the visible page content
<h1> element defines a large heading
<p> element defines a paragraph
You can find the full HTML breakdown here
CSS:
For the sake of web-exploitation, you don’t need to know much about CSS. Here is a basic tutorial for those who want to learn how to make their websites look pretty!
Javascript:
One of the reasons why Javascript is used because it allows us to add interactivity between the user and the website. Javascript allows the user to interact with the website and have the website respond.
By right clicking on a website on Google Chrome or Firefox you can select the option “Inspect” to see the code that the website is running on your computer. It allows you to see the HTML and CSS that is running on the website and it will also let you see the Javascript scripts running on your computer. The best part is, that you can edit the HTML directly and see it affect the website, so it lets you modify the website as you desire. You can also select “Inspect Element” to see the code that is running in a specific part of a website.
What is HTTP?
It provides a standardised way for computers to communicate with each other over the internet. HTTP is a communication protocol, that is used to deliver data (HTML files, image files, query results, etc.) over the internet. HTTP dictates how data is sent between clients (you) and servers.
GET and POST requests:
GET is used to request data from a specified resource.
GET is one of the most common HTTP methods.
POST is used to send data to a server to create/update a resource.
Full link: https://www.w3schools.com/tags/ref_httpmethods.asp
Cookies:
HTTP cookies, also called web cookies or browser cookies are basically small bits of data that servers send to a user’s web browser. The browser can store it, and may also send the cookie back when it next requests information from the same server. Normally cookies are used to tell if two requests came from the same browser. For example, cookies can help users stay logged-in to websites. Cookies have three main purposes:
Session management - logins, shopping carts, game scores and any other information that the server should remember about the user
Personalisation - user preferences, themes and other settings
Tracking - recording and analysing user behaviour
How to perform a basic SQL injection:
SQL is a language that is used to basically fetch information from databases in websites. These databases can contain information like usernames and passwords for accounts for that website. If the code that is written isn’t secured, we can perform what’s called an SQL injection to gain access to data that we normally wouldn’t have access to.
<?php
$username = $_GET['username'];
$result = mysql_query("SELECT * FROM users WHERE username='$username'");
?>
If we look at the ‘$username’, this variable is where the username for a log in attempt would be stored. Normally the username would be something like, ‘user123’, but a malicious user might submit a different kind of data. For example, consider if the input was '?
The application would crash because the resulting SQL query is incorrect.
SELECT * FROM users WHERE username='''
Note the extra red quote at the end. Knowing that a single quote will cause an error, we can expand a little more on SQL Injection.
What if our input was ' OR 1=1?
SELECT * FROM users WHERE username='' OR 1=1
1 is indeed equal to 1, which equates to true in SQL. If we reinterpret this the SQL statement is really saying
SELECT * FROM users WHERE username='' OR true
This will return every row in the table because each row that exists must be true. Using this, we can easily gain access to information that we aren’t supposed to!
3 notes
·
View notes
Text
30 Basic HTML Interview Questions and Answers

1. What is HTML?
HTML stands for Hypertext Markup Language. It is the standard markup language used for creating web pages and applications on the internet. HTML uses various tags to structure the content and define the elements within a web page
2. What are the basic tags in HTML?
Some of the basic tags in HTML include:
<html>: Defines the root element of an HTML page.
<head>: Contains meta-information about the HTML document.
<title>: Sets the title of the HTML document.
<body>: Defines the main content of the HTML document.
<h1>, <h2>, <h3>, etc.: Heading tags used to define different levels of headings.
<p>: Defines a paragraph.
<a>: Creates a hyperlink.
<img>: Inserts an image.
<div>: Defines a division or a container for other HTML elements.
Click : https://phpgurukul.com/30-basic-html-interview-questions-and-answers/
3. What is the difference between HTML and CSS?
HTML (Hypertext Markup Language) is used for structuring the content of a web page, while CSS (Cascading Style Sheets) is used for styling the HTML elements. HTML defines the elements and their semantic meaning, whereas CSS determines how those elements should be visually presented on the page.
4. What is the purpose of the alt attribute in the img tag?
The alt attribute in the <img> tag is used to provide alternative text for an image. It is displayed if the image cannot be loaded or if the user is accessing the page with screen readers for accessibility purposes. The alt text should describe the content or purpose of the image.
5.What are the new features in HTML5?
HTML5 introduced several new features, including:
Semantic elements like <header>, <footer>, <nav>, <section>, etc.
Video and audio elements <video> and <audio> for embedding multimedia content.
<canvas> for drawing graphics and animations.
Local storage and session storage to store data on the client-side.
New form input types like <email>, <url>, <date>, <range>, etc.
Geolocation API for obtaining the user’s location.
Web workers for running scripts in the background to improve performance.
6. What is the purpose of the doctype declaration in HTML?
The doctype declaration (<!DOCTYPE>) specifies the version of HTML being used in the document. It helps the web browser understand and render the page correctly by switching to the appropriate rendering mode. It is typically placed at the beginning of an HTML document.
7. What is the difference between inline and block elements in HTML?
Inline elements are displayed within a line of text and do not start on a new line. Examples of inline elements include <span>, <a>, <strong>, etc. Block elements, on the other hand, start on a new line and occupy the full width available. Examples of block elements include <div>, <p>, <h1> to <h6>, etc.
8. How can you embed a video in HTML?
You can embed a video in HTML using the <video> element. Here’s an example:
1
2
3
4
<video src="video.mp4"controls>
Your browser does notsupport the video tag.
</video>
In this example, the src attribute specifies the video file URL, and the controls attribute enables the default video controls like play, pause, and volume.
9. What is the purpose of the <script> tag in HTML? The <script> tag is used to include or reference JavaScript code in HTML, allowing developers to add interactivity and dynamic functionality to web pages. It can be used for inline scripting, external script files, or event handlers.
10. How do you create a hyperlink in HTML?
You can create a hyperlink using the <a> (anchor) tag. For example: <a href="https://www.example.com">Link</a>.
11. How do you create a table in HTML?
You can create a table using the <table> tag along with related tags like <tr> (table row), <th> (table header), and <td> (table data).
12. What is the purpose of the rowspan and colspan attributes in a table?
The rowspan attribute specifies the number of rows a table cell should span, while the colspan attribute specifies the number of columns.
13. How do you create a form in HTML?
You can create a form using the <form> tag. It can include various form elements such as input fields, checkboxes, radio buttons, and submit buttons.
14. How do you validate a form in HTML?
HTML provides basic form validation using attributes like required, minlength, maxlength, and pattern. However, client-side or server-side scripting is often used for more complex validation.
15. What is the purpose of the <label> tag in HTML forms?
The <label> tag defines a label for an input element. It helps improve accessibility and usability by associating a text label with its corresponding form field.
16. What is the difference between the <head> and <body> sections of an HTML document?
The <head> section contains meta-information about the HTML document, such as the title, links to stylesheets, and scripts. The <body> section contains the visible content of the web page.
17. How do you embed audio in HTML?
You can embed audio in HTML using the <audio> tag. Here’s an example:
1
2
3
4
<audio src="audio.mp3"controls>
Your browser does notsupport the audio element.
</audio>
In this example, the src attribute specifies the audio file URL, and the controls attribute enables the default audio controls like play, pause, and volume.
18. How do you create a dropdown/select menu in HTML?
You can create a dropdown/select menu using the <select> tag along with the <option> tags for each selectable item. For example:
1
2
3
4
5
6
<select>
<option value="option1">Option1</option>
<option value="option2">Option2</option>
<option value="option3">Option3</option>
</select>
19. How do you add a background image to an HTML element?
You can add a background image to an HTML element using CSS. For example:
1
2
3
4
5
6
7
8
9
10
11
12
<style>
.container {
background-image:url("image.jpg");
background-size:cover;
/* Additional background properties */
}
</style>
<div class="container">
<!--Content goes here-->
</div>
20. What is the purpose of the <iframe> tag in HTML?
The <iframe> tag is used to embed another HTML document or web page within the current document. It is commonly used to embed videos, maps, or external content.
21. How do you create a hyperlink without an underline?
You can remove the underline from a hyperlink using CSS. For example:
1
2
3
4
5
6
7
8
9
<style>
a {
text-decoration:none;
}
</style>
<ahref="https://www.example.com">Link</a>
22. How do you make a website responsive?
To make a website responsive, you can use CSS media queries to apply different styles based on the screen size. You can also use responsive frameworks like Bootstrap or Flexbox to build responsive layouts.
23. What is the purpose of the target="_blank" attribute in a hyperlink?
The target="_blank" attribute opens the linked page or document in a new browser tab or window when the user clicks on the hyperlink.
24. How do you create a numbered list in HTML?
You can create a numbered list using the <ol> (ordered list) tag along with the <li> (list item) tags for each list item.
25. How do you add a video from YouTube to an HTML page?
You can embed a YouTube video in an HTML page using the <iframe> tag with the YouTube video URL as the source. For example
1
2
<iframe width="560"height="315"src="https://www.youtube.com/embed/video_id"frameborder="0"allowfullscreen></iframe>
Replace “video_id” with the actual ID of the YouTube video you want to embed.
26. What is the purpose of the readonly attribute in an input field?
The readonly attribute makes an input field read-only, preventing the user from modifying its value. The value can still be submitted with a form.
27. How do you create a tooltip in HTML?
You can create a tooltip using CSS and the title attribute. For example:
1
2
3
4
5
6
7
8
9
10
11
12
13
14
15
16
17
18
19
20
21
22
23
24
25
26
27
28
29
30
31
32
33
34
35
36
37
<style>
.tooltip {
position:relative;
display:inline-block;
}
.tooltip .tooltiptext {
visibility:hidden;
width:120px;
background-color:#000;
color:#fff;
text-align:center;
border-radius:6px;
padding:5px;
position:absolute;
z-index:1;
bottom:125%;
left:50%;
transform:translateX(-50%);
opacity:0;
transition:opacity0.3s;
}
.tooltip:hover .tooltiptext {
visibility:visible;
opacity:1;
}
</style>
<div class="tooltip">
Hover over me
<span class="tooltiptext">Thisisatooltip</span>
</div>
```
Inthisexample,the`.tooltip`classsets the container element,andthe`.tooltiptext`classdefines the appearance andpositioning of the tooltip.
28. What is the purpose of the required attribute in an input field?
The required attribute is used to specify that an input field must be filled out before submitting a form. It helps enforce form validation.
29. How do you add a favicon to a website?
To add a favicon to a website, place a small icon file (typically named “favicon.ico”) in the root directory of the website. The browser will automatically detect and display the favicon.
30. How do you create a hyperlink that sends an email?
You can create a hyperlink that sends an email using the mailto: protocol. For example:
1
2
<ahref="mailto:[email protected]">Send Email</a>
When the user clicks on this link, it will open the default email client with the recipient address pre-filled.
These are additional HTML questions and answers to expand your knowledge. Remember to practice and experiment with HTML to solidify your understanding.
About Us :
We are a web development team striving our best to provide you with an unusual experience with PHP. Some technologies never fade, and PHP is one of them. From the time it has been introduced, the demand for PHP Projects and PHP developers is growing since 1994. We are here to make your PHP journey more exciting and useful.
You can also contact me on :
Request for New Project: [email protected]
For any PHP related help: [email protected]
For any advertising, guest post, or suggestion: [email protected]
0 notes
Text
Some Advanced HTML Tags and Techniques: Take Your Web Design Skills to the Next Level

HTML (Hypertext Markup Language) is the standard markup language used for creating web pages. It allows you to structure content and define its meaning, layout, and appearance on a web page. Here are some advanced HTML tags and techniques that can help you create more dynamic and interactive web pages.
HTML Head
The HTML head element contains information about the document, such as the page title, meta information, and links to external resources. The head element is included in the HTML file before the body element and is not visible on the page. It is used to provide information that the browser or search engine can use to better understand and display the document. Some common elements found in the head include the title tag, meta tags for SEO, links to stylesheets, and references to JavaScript files. By including the appropriate information in the head element, you can help to improve the user experience and search engine optimization of your web pages.
Learn More About HTML Head
HTML Color
HTML color is an important aspect of web design, and learning to use color codes effectively can enhance the visual appeal of a web page or website. HTML color codes can be used with various HTML elements, such as <body>, <div>, <h1>, <p>, and <a>, to name a few. They can also be used in CSS code to style elements within a page or an entire website.
Learn More About HTML Color
Semantic HTML
Semantic HTML uses tags to describe the meaning and structure of content, rather than just its appearance. This makes it easier for search engines and screen readers to understand the content of a web page. Examples of semantic tags include <header>, <main>, <nav>, <section>, and <article>.
Learn more about HTML Semantic
Custom Attributes
HTML allows you to create your own custom attributes for elements. This can be useful for storing additional data or metadata about an element, such as a data attribute for storing an ID or a tooltip. Custom attributes should be prefixed with "data-", such as data-id or data-tooltip.
Learn more about HTML Attributes
HTML Forms
HTML forms are used to collect user input and are a fundamental component of many web applications. Advanced form techniques include validation, using the required attribute, and customizing the appearance with CSS.
Learn more about HTML Forms
HTML5 Canvas
The HTML5 canvas elementallows you to create dynamic graphics and animations on a web page. With JavaScript, you can draw shapes, lines, text, and images, and animate them using various techniques.
Learn more about HTML Canvas
Responsive Images
Responsive images ensure that images are displayed at an appropriate size and resolution for the user's device and connection speed. HTML provides several ways to implement responsive images, including the srcset and sizes attributes, and the picture element.
Learn more about HTML Images
HTML Table
HTML tables are used to display data in a structured and organized manner. They consist of rows and columns, and each cell can contain text, images, links, or other HTML elements. To create a table, you use the <table> tag, and then add rows with the <tr> tag and cells with the <td> or <th> tag. The <th> tag is used for table headers. You can also add attributes such as "border", "cellspacing", and "cellpadding" to the <table> tag to adjust the appearance of the table. By using HTML tables, you can present data in a clear and readable format on your web page.
Learn more about HTML Table
HTML Class
HTML classes allow you to apply a specific style or behavior to a group of HTML elements. To create a class, you use the "class" attribute and assign a name to it, such as "my-class". You can then add this class to one or more HTML elements by using the "class" attribute followed by the class name, such as "class=my-class". This makes it easier to apply consistent styles across your website and to make changes to those styles by editing the class definition in your CSS stylesheet. Classes can also be used to target elements with JavaScript or jQuery, making it easier to manipulate their behavior and appearance. By using HTML classes, you can create a more flexible and maintainable website design.
Learn more about HTML Class
HTML JavaScript
HTML and JavaScript work together to create dynamic and interactive web pages. JavaScript is a programming language that can be embedded in HTML documents to add interactivity, animations, and other dynamic features. You can include JavaScript code in your HTML document using the <script> tag, either by including it directly in the HTML file or by referencing an external JavaScript file. JavaScript can interact with HTML elements, manipulate the DOM, and communicate with servers to dynamically update web content without requiring a page refresh. By using HTML and JavaScript together, you can create powerful and engaging web applications that run directly in the browser.
Learn more about HTML JavaScript
In conclusion
By utilizing advanced HTML tags and techniques, web developers can take their web design skills to the next level. From creating dynamic animations with the canvas element, to implementing responsive images and web components, these techniques allow for more interactive and user-friendly web experiences. Additionally, it is important to consider accessibility when designing web content, ensuring that all users can access and interact with the content. With these tools and techniques, web developers can create more engaging, accessible, and responsive web pages.
#Advanced HTML Tutorial#Online Tutorial for Web Designing#webtutor#learn advanced HTML and CSS#learn HTML Head#online HTML Head#learn HTML Color#HTML head Elements#HTML head tag#What is Html Head?#Head Tag in HTML#HTML Semantic Elements#What Is Semantic HTML#Semantic Tags in HTML#learn HTML Attributes#what is HTML Attributes?#HTML Forms#free learn HTML Forms#HTML5 Canvas#learn HTML5 Canvas#learn HTML Class#learn HTML Table#HTML JavaScript#Learn HTML JavaScript#Online HTML JavaScript
1 note
·
View note
Text
JavaScript add rows to the table dynamically
JavaScript add rows to the table dynamically: This type of component can achieve using JavaScript without any plugins or third-party code.
Now let’s see how to make this Component:
Open your code editor and create three files:
HTML
CSS
JavaScript
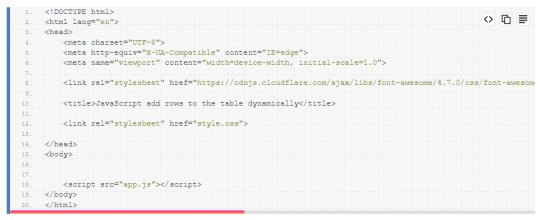
Write the basic structure of HTML like given below:

How to connect CSS files with HTML?
Connect your CSS file with HTML by using
<link href="stylesheet" href="yourstyle.css" />
How to connect JavaScript with HTML?
Connect your js file with HTML by using
<script src="app.js" ></script>
In this project, we need some icons for that I am using “fontawesome 4.7” Icon’s CDN. here is the CDN with link tag, copy and paste it inside the head tag.
<link rel="stylesheet" href="https://cdnjs.cloudflare.com/ajax/libs/font-awesome/4.7.0/css/font-awesome.css" integrity="sha512-5A8nwdMOWrSz20fDsjczgUidUBR8liPYU+WymTZP1lmY9G6Oc7HlZv156XqnsgNUzTyMefFTcsFH/tnJE/+xBg==" crossorigin="anonymous" />
After adding CDN code should look like this:
Read Full Article...
0 notes
Text
LET’S TALK DYNAMIC WEBSITES

So far we have been looking at client-side technologies, such as HTML & CSS.
All modern websites are made from HTML, CSS & JavaScript.
But almost all are also built using server-side technologies, including scripting languages and a database.
STATIC WEBSITES
Where the content does not change unless you change the source code.
How static website is delivered:

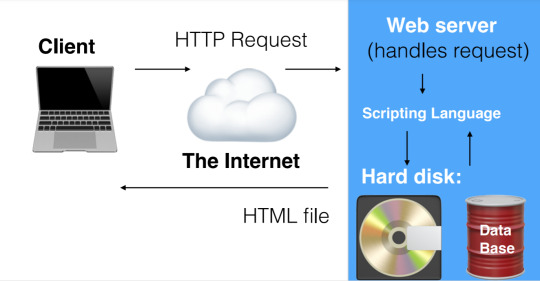
DYNAMIC WEBSITE
Here, the server application constructs the page, usually using a scripting language in conjunction with a database.
In the dynamic world, The content of the page may change depending on input (forms filled in) or user logins etc.
How to deliver a dynamic website:
SCRIPTING LANGUAGE
It is also known as server side
Server-side scripts run on a web server and interpret requests to provide customized web pages depending on the user's request.
Examples of scripting languages: PHP, ASP, Python, Ruby, Java.
Java
You can write server processes using Java
JavaScript was traditionally known as a client-side scripting language, but now with technologies such as node.js it is often used on the server-side too.
PHP
PHP is a popular server-side scripting language.
PHP stands for: PHP: Hypertext Pre-processor.
This is a hypertext-pre processor meaning it processes before the scripting language.
PHP code must be executed by a PHP interpreter which must be installed a module on a web server.
A browser does not understand PHP (unlike, say, HTML or JavaScript) If you purchase web hosting it usually includes PHP
PHP code is often embedded in an HTML page.
Example:
<!DOCTYPE html>
<html lang="en">
<head>
<title>Example of PHP</title>
</head>
<body>
<?php echo '<p>Hello, World!</p>'; ?>
</body>
</html>
PHP is distinguished from HTML by it’s delimiters.
A block of PHP starts and with <?php and ends with ?>
DATABASE
This is an organised collection of data, typically stored and accessed on a computer.
A database management system is the software that allows users to interact with a database/ the software that manages the database
RELATIONAL DATABASES
A relational database organises the data into tables of rows and columns. Each record in the table is a row. Rows in different tables can be related or linked to each other.
MySQL
MySQL is a popular open-source relational database management system.
SQL stands for Structured Query Language, a language used to interact with, programme and edit databases.
PHP + MySQL
PHP and MySQL are often used together on servers to deliver dynamic webpages.
PHP is the most popular scripting language for web development. It is free, open source and server-side (the code is executed on the server). MySQL is a Relational Database Management System (RDBMS) that uses Structured Query Language (SQL). It is also free and open source.
CONTENT MANAGEMENT SYSTEMS
An application which allows users to add, edit, delete content on a website.
Example: Tumblr & Moodle-You can add, edit or delete posts without knowing any of the scripting languages
Users can run a dynamic, database driven website often without any knowledge of code.
With a Content Management System, a user can login and submit content to a website without altering any code.
Web Content Management Systems are installed on web servers.
WORDPRESS
WordPress is a popular Content Management System built using PHP and MySQL.
Originally associated with blogging, it is now used for news websites, eCommerce sites, forums, galleries, commercial sites etc.
A lot of websites which have a blog inside would have wordpress
Wordpress.com-This is like Tumblr where all the hosting is done for you
Wordpress.org-Here you have to install wordpress. Hosting is not done for you. In order to install WordPress you need a server, with PHP & MySQL (or MariaDB)
SERVER SIDE
The college has a server, Knuth.
You all have access to Knuth, to put up files and access them via a web browser.
You also have one MySQL database setup.
SFTP-Secure File Transfer Protocol
This is a piece of software that allows you to securely transfer files to a server
To access the server and put files on it, you need an SFTP Client.
To connect to the server, you will need to give your SFTP Client some information:
1. Server address
2. Port
3. Connection type
0 notes
Text
How to calculate sum of column in jquery
How to calculate sum of column in jquery
In this article, we learn about how to calculate sum of column in jquery, or you can also say how to calculate the value when giving input to the column. In this article we will jquery version 3.X and bootstrap version 4 to give some feel to our form. You will learn about each function() , parse column data in this article. Below is the basic html code which includes cdn in their…
View On WordPress
#"calculate sum total of column in jquery#calculate sum total of column in jquery how to calculate total in jquery#how to calculate sum of column values in javascript#how to calculate total in jquery#how to dynamically add row and calculate sum using jquery#javascript sum table row values#jquery datatable sum of particular column#update column value in html table using jquery#using jquery to perform calculations in a table
0 notes
Text
Basic Information About C Language [Updated]

Do you want to learn basic information about the c Language?
Yes!
That’s great.
This article is the right choice for you.
Here, I will provide you all the basic information about C language.
Introduction Of C Language
C is a high-level computer programming language.
Usually, this language is designed to be compiled with a relatively simple compiler.
It provides low-level access to memory.
So, it requires minimum runtime support to process instructions.
It is also known as:
Mother programming language
System programming language
Mid-level programming language
Procedure-oriented programming language
Structured programming language
If you learn this language, another programming language is easy to understand for you.
History Of C Language
It is interesting to know the history of the C language.
Here, I discuss a brief history of the c language.

It was originally invented by Dennis Ritchie in 1972 at AT & T’s Bell Laboratory in the USA.
It was primarily developed to writing UNIX operating system.
Gradually, it becomes a very popular programming language in the worldwide.
It has been standardized by the American National Standards Institute (ANSI) since 1989 and subsequently by the International Organization for Standardization (ISO).
Timeline of C language development
Version NameYearDeveloperC1972Dennis RitchieK&R C1978Brian Kernighan & Dennis RitchieANSI C1989ANSI CommitteeISO C1990ISO CommitteeC991999Standardization CommitteeC112011Standardization CommitteeC182017/2018Standardization Committee
Features Of C Language
There are different types of features are available in the C language.
All the features are not possible to mention in one article.
Although, some of the key features are mentioned here:
Fast and Efficient
Easy to Extend
Procedural Language
Simple and clean style
Middle-Level Language
Low-level access to memory
Libraries with rich Functions
Rich set of built-in Operators
A simple set of keywords
Support memory management

These features make C language suitable for system programs like an operating system or compiler development.
Later programming languages have borrowed syntaxes and features directly or indirectly from C language.
Java, PHP, JavaScript, and many other programming languages are mainly based on C language.
Note: C++ is almost a superset of C (very few programs can be compiled with C, but not with C++).
Data Types
Each variable contains a specific data type.
Data types are used to define the data storage format.
Each data type requires different amounts of memory space and has some specific features.
There are mainly 4 data types that are mostly used in c programming.
Those are described here.
int: It is used to store an integer type value (numbers).
char: It stores a single character (alphabets).
float: It is used to store decimal numbers (floating-point value) with single precision.
double: It is also used to store decimal numbers (floating-point value) with double precision.
An int is signed by default.
It means it can represent both positive and negative values.
On the other hand, an unsigned int can never be negative.
All data types are listed here.
Data TypeMemory (Bytes)RangeFormat specifiershort int2-32768 to 32767%hdunsigned short int20 to 65535%huunsigned int40 to 4294967295%uint4-2147483648 to 2147483647%dlong int8-2147483648 to 2147483647%ldunsigned long int80 to 4294967295%lulong long int8-(2^63) to (2^63)-1%lldunsigned long long int80 to 18446744073709551615%llusigned char1-128 to 127%cunsigned char10 to 255%cfloat4%fdouble8%lflong double16%Lf
You can also use the sizeof() operator to check the size of any variable.
Variables
A variable is a simple word or letter that allocates some space in memory.
Basically, a variable used to store some different types of data.
Different types of variables require different amounts of memory and have some specific set of operations that can be applied to them.
/* example of declaring variable*/int a; //Here a is integer type variablechar b; // Here b is character type variablefloat c; // Here c is float type variable
Rules For Defining Variables
A variable can have any alphabet, digit, and underscore.
A variable name must start only with the alphabet, and underscore. It can’t start with a digit.
No space is allowed within the variable name.
A variable name can not be any reserved word or keyword. (e.g. int, void, etc.)
Arrays
An array is a data structure that contains the same types of data items.
A variable can carry only one data item at a time.
If you want to store multiple data items in a data type, you need to use an array.
You can not initialize an array with more elements than the specified size.
The specified size is declared to the left of the variable between the third brackets.
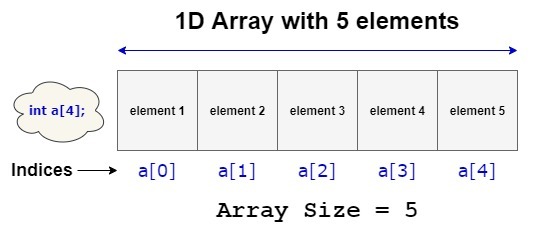
A one-dimensional array is like a row list.
On the other hand, a two-dimensional (2D) array is like a table.
Arrays consist of contiguous memory locations.
Array Declaration
1. Array declaration by specifying the size
int a[5];
2. Array declaration by initializing the elements
int a[] = { 10, 20, 30, 40 };
3. Array declaration by specifying the size and initializing the elements
int arr[5] = { 10, 20, 30, 40 };
Note: You can use While or For loops to add values in the variables.
Pointers
A pointer is a variable that stores the address of another variable.
For example, an integer variable stores an integer value, however an integer pointer stores the address of an integer variable.
We use the unary operator & (ampersand) that returns the address of a variable.
#include <stdio.h> int main() { int x; printf("%p", &x); return 0; }
Here, &x print the address of variable x.
Keywords
Keywords are specific reserved words in C which attached with a specific feature.
The list of keywords includes almost all the words that can help us to use the functionality of the C language.
C does not contain very large number of keywords.
However, there are 32 keywords are available in C98 language.
autobreakcasecharconstcontinuedefaultdodoubleelseenumexternfloatforgotoifintlongregisterreturnshortsignedsizeofstaticstructswitchtypedefunionunsignedvoidvolatilewhile
C99 reserved five more keywords.
_Bool_Imaginaryrestrict_Complexinline
C11 reserved seven more keywords.
_Alignas_Atomic_Noreturn_Thread_local_Alignof_Generic_Static_assert
Most of the recently reserved words begin with an underscore followed by a capital letter.
Because identifiers of that form were previously reserved by the C standard for use only by implementations.
Operators
C supports a rich set of operators, which are different types of symbols.
Each operator performs a specific operation with a variable.
All operators are listed in the following table.
Operator NameOperator SymbolArithmetic+, -, *, /, %assignment=augmented assignment+=, -=, *=, /=, %=, &=, |=, ^=, <<=, >>=bitwise logic~, &, |, ^bitwise shifts<<, >>boolean logic!, &&, ||conditional evaluation? :equality testing==, !=calling functions( )increment and decrement++, —member selection., ->object sizesizeoforder relations<, <=, >, >=reference and dereference&, *, [ ]sequencing,subexpression grouping( )type conversion(typename)
These operators tell the compiler to perform specific mathematical or logical operations.
Memory Management
The most important function of a programming language is to provide facilities for managing memory and objects that are stored in memory.
C language provides 3 unique ways to allocate memory for objects.
Static Memory Allocation
This is an allocation technique that allocates a fixed amount of memory during compile time.
Dynamic Memory Allocation
This is also an allocation technique that manages system memory at runtime.
Automatic Memory Allocation
When you declare an automatic variable (such as a function argument or a local variable), then it happens.
Libraries
Library functions are inbuilt functions in C language that are grouped together in common files. This file is called the C standard library.
Each library provides specific functions to perform specific operations.
We can use these library functions to get the pre-defined output instead of writing your own huge complex code to get those outputs.
All C standard library functions are declared in header files which are saved as filename.h.
We are including the library in the header files in our C program.
#include<filename.h>
The command allow to use of the functions that are declared in the header files.
Basic Structure Of C Program
A set of rules is defined for the C programs that are called protocols.
The protocols help us to design the basic structure of a program.
Here, I mentioned the basic structure of a C program.
Documentation section
Link section
Definition section
Global declaration section
Main function section
Sub-program section
All C programmers must follow the protocols when writing any program.
Let’s discuss all the basic structure sections of a C program.
Documentation Section
The documentation section is a part of the program where the programmers provide the details about the program.
In this section programmers usually give the name of the program and the details related to the program.
This code gives an overview of the program.
//program name/*This is aC Program*/
Link Section
This section is used to declare all the header files that will be used in the program.
It tells the compiler to link the header files to the system library.
#include<stdio.h>
Definition Section
In this section, we can define different types of constants.
The keyword define is used to define a constant value in this part.
#define PI=3.14
Global Declaration Section
All the global variables are declared in this section.
User-defined functions are also declared in this section of the code.
int a,b,c;
Main Function Section
Every C-programs must have the main function.
The main function contains 2 parts.
1. Declaration Part: All the variables are declared in this part.
2. Execution Part: This part starts with the curly brackets and ends with the curly close bracket.
Both the declaration and the execution part are writing inside the curly braces.
int main(){int a=5;printf(" %d", a);return 0;}
Sub-program Section
All user-defined functions are defined in this section.
int add(int a, int b){return a+b;}

Hello World C Program
This is the source code of a basic “Hello World” Program.
#include<stdio.h>int main(){/*First basic C Program*/printf("Hello World.");getch();return 0;}
After compiling the source code the output will be the following:
Output:
Hello World.
Explanation of “Hello World” C Program
Here, I explained each line of the “Hello World” C program.
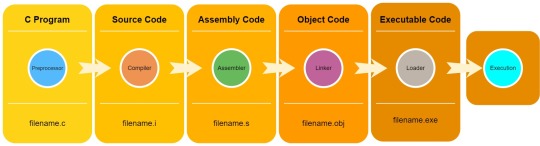
#include <stdio.h>
This is a preprocessor command that includes the input header file from the C library before compiling a program.
int main()
This is the main function of executing any C program begins.
{
It represents the beginning of the main program.
/*First basic C Program*/
If any words exist inside the command /* and */ in any C program that won’t be considered for compilation and execution. This is also called a comment line.
printf(“Hello World.“);
The printf command displays the words in the quote on the screen.
getch();
This function is used to hold the output screen and wait until the user gives any type of input. So that we are able to see the output on the screen.
return 0;
Here, the return is a keyword that is used to return some value from a function.
The main function returns an integer value, therefore here we are returning 0.
It means our program has been run successfully and we terminate our main function with this return statement.
}
It represents the ending of the main program.
Create a C Program
Are you want to create and execute a C programs yourself?
Then you need to follow the instructions:
At first, you need to install a C supported IDE (Integrated Development Environment) on your computer.
Once the IDE is installed on your computer, you can open and create a C program.
If you don’t want to install the IDE on your computer, you can use an online compiler or IDE.
The good thing about the online compiler is it can compile C, C++, C#, Java, and many other programming languages.
We also provide some links to the online and offline IDE in this article that can help you to create and execute your C program easily.
Best IDE For C

You can create and edit C programs with any code editor or even a general editor.
Yet, it is very important to choose the best IDE for beginners.
If the IDE is integrated with the C compiler, the process of creating and compiling the C program will be easier.
Anyway, we collect some best IDE for c program that can help you to write and execute any c program easily.
Here are some collection,
Run C Program Online
Onlinegdb IDE
Tutorialspoint IDE
Rextester IDE
Run C Program On Android Phone
TruboCdroid
Cxxdroid
TurboCPlus
CppDroid
Run C Program On Windows
Turbo C++
Dev C++
Code::Blocks IDE
Run C Program In Mac OS
Turbo C++
Code::Blocks IDE
Run C Program In Linux
Code::Blocks IDE
Choose the best IDE that makes you comfortable to create and edit the C program.
Thus, your programming skills will increase and you will be able to create any program within a few minutes.
Advantages Of C Language
It is one of the most useful programming languages when the system requires quick and direct access to the hardware.
C is the most commonly used system with limited resources (such as memory).
Where performance is the most important attribute, C is the best choice for programmers.
Disadvantages Of C Language
C does not support OOP (Object-oriented programming) concepts, that’s why C++ is developed.
There is no runtime checking ability in the C language. It only does compile-time checking.
It does not support the concept of the namespace. We cannot declare two variables of the same name without namespace.
It does not have the concept of constructor and destructor.
Uses Of C Language
There are different types of uses of C language in programming.
Some uses are the following:
C mainly used to develop system software, operating systems, BIOS, Embedded Systems, Real-time systems.
To develop application software like databases (MySQL) and 3D software (Autodesk Maya).
Used to create graphical related applications like computers and mobile games.
To evaluate any types of logical and mathematical equations using c language.
UNIX kernel is completely made in C Language.
The language is used to design different language compilers.
Conclusion
The C language doesn’t seem to have an expiration date.
It has a closeness to the hardware, great portability, and deterministic usage of resources.
For these features, it is the ideal programming language for low-level development of things like operating system kernels and embedded software.
Its good performance, efficiency, and versatility make it an excellent choice to develop highly complex data manipulation software like MySQL, 3D animation, and more.
C is still unsurpassed where performance is the main priority.
I hope now you know all the basic information about the C language.
Now it’s your turn.
What do you think about C Language?
Share your thoughts in the comment box.
Would you like a copy of the article?
Yes! Give me PDF
from Blogwaping https://www.blogwaping.com/2020/07/basic-information-about-c-language_18.html
0 notes
Text
How To Use Graph and Chart Plugins

Whether you’re a researcher compiling data about a local election or a teacher sharing data about the local wildlife population with your class, there are no better substitutes than charts and graphs. These visual tools turn boring, seemingly worthless data into easily-digestible information. Presenting data to your blog readers as the straight text gets boring very quickly and it takes much longer for most people to understand tables and text descriptions. If you have a lot of data, you need to get the point across in an effective way, and charts can help. Data visualization is the process of taking raw (usually numerical) data and converting them into a visual presentation. Techniques for converting raw data have existed for many decades already. It is better to add dynamic graphs that can be easier to update. There are a number of chart and graph WordPress plugins that you can install to ensure amazing looking data. This can boost sales and attract a better audience.
Best WordPress Chart Plugins :
Visualizer
With over ten thousand active installs and a 4.6-star satisfaction rating, Visualizer: Charts and Graphs is the most popular plugin in the WordPress plugin repository for creating, managing and embedding interactive charts into WordPress posts and pages. Create responsive, fully-customizable tables and charts, edit them directly on your posts with our excel-like editor or import the data from your database. When you install the plugin, you will be able to easily locate the button for Visualizer in the WordPress classic editor toolbar. If you are also using the Gutenberg plugin, you will see the option for Visualizer in the main block menu. Do make sure that the visual editor mode is turned on or else you won’t be able to see the button. You can easily upload the data for your chart or file through a CSV file through direct uploads or imports via URLs. In the pro version, you will get four extra chart types including timeline charts, combo charts, gauge charts, and candlestick charts. The best feature in the premium plugin version is the ability to design new charts from pages and posts. There are also more additional charts available as well which can add functionality, ability to edit, and creating private charts. The plugin makes use of Google Visualization API so as to add charts, which aid pass-browser compatibility (adopting VML for older IE types) and go-platform portability to iOS and new Android releases. Adding a chart to your site is done via the Visualizer Library, which is added under the WordPress Media Library. The data for your chart is pulled in from a CSV file, either uploaded directly or linked to online. The latter allows you to base your chart on a Google Spreadsheet, for example. The data types that are allowed include string, number, boolean, date, time date, and time of day. Once a chart is created, it is added to the post or page with a shortcode.
Features
Multiple chart types
Customizable chart displays
Can link to a spreadsheet by URL
Custom hooks
Cross-browser and cross-platform rendering
WP Charts and Graphs
WordPress Charts is one of the best plugins in its niche, with over 15,000 downloads and a 4.8 rating on WordPress.org, Many users like it for the clean designs, animations, and colorful options. However, also be aware that it hasn’t been updated for quite a while. This data visualization WordPress plugin is all set to get you going, even if you are not really tech-savvy. From your admin panel, you can create the chart that you fancy and see the live preview first before you go live. If it needs any additional tweaks, now is the time to make them happen. There are six main types of chart types that you can design: doughnut chart, polar area chart, line chart, pie chart, and radar chart. You can insert them into your post or page easily via widgets or shortcodes. All of these charts are built using HTML5. The customization options are pretty much endless, but you will have to know a little bit about coding, shortcodes, or at least adjusting the default settings. The developer has promised several appealing features in the near feature—including color pallette styling options, a revamped chart creation process, and a table chart type.
Features
On-page data editing
15 chart types – 6 from Charts.js and 12 from Google charts
Easy to import database
Automatic data synchronization by creating schedules
Animated charts
Private charts
Chart creation based on your WP posts, attachments, or pages
Instant search
Filter results based on text
Multi-column ordering
Permission feature to control viewing and editing of charts
Responsive Charts
Responsive Charts is one of the best plugins for people who want an affordable option. It lets you create seven interactive charts that will look amazing on your WordPress.org site. The charts are made through charts.js and you can make radar charts, bootstrap progress bars, doughnut chart, pie chart, bar chart, polar chart, and line chart.Responsive Charts is an affordable chart solution that lets you create seven animated chart types. Want to use Chart.js with WordPress but don’t know how? Responsive Charts got your back! HTML5 friendly and animation-powered charts for all! Select the chart type from a dropdown, specify the width and title, and customize colors any way you like. Because of Canvas (HTML5), the charts come out really well rounded and function equally smooth on any device type or size.
Features
Animated responsive charts
CSV data import
Customizable charts
Uncommon chart types (e.g. radar, progress bars)
Uber Chart
The advanced WP plugin with excellent customization, UberChart lets you create charts of different varieties. It offers 240 options for each chart and 30 options for each data set in order to create charts tailored to your specific requirements. You can export and import data with the click of a button, and the responsive design ensures that all your graphs show up on every device. Some of the chart types include- Line charts, Area charts, Bar charts, Pie charts, Doughnut charts, Bubble charts. You can also modify the charts later with a few clicks of a button, which is really great if you want to update them. You can also duplicate some charts to use them as templates for any new charts that you want to add to your WordPress site. You can import data onto the plugin using a CVS file. The best thing is that you can even copy and paste the data from an Excel or Google spreadsheet. There are a ton of styling options, including padding, margins, colors, radius length and more. A preview of your chart is displayed in the heart of the settings page. It offers general customization options to define a chart’s general behavior such as setting the size, background color, and margin, whether you want chart responsiveness or not, type and speed of animation, title and legend behavior, tooltip style, etc. This plugin is a simple way to create charts and is not very expensive, so if you need animated charts, it may be a good option for you. Using the spreadsheet editor, you can copy data to UberChart from an online spreadsheet such as Google Sheets, MS Excel, etc. and vice versa. You can also add data easily and drag rows and columns. The import and export option is also available to backup your charts in the form of XML files.
amCharts
Up next on our list is amCharts , which has over one thousand active installs and a 5 star satisfaction rating. Though less popular, this plugin has received some great reviews.amCharts is the best plugin for more advanced WordPress bloggers and users who are past the basic simple tools that other plugins provide. The plugin was developed by the charts and maps Javascript service, amcharts . Adding JavaScript Maps and Charts into a WordPress post is an invitation to annoyance. It is because WP removes all the JavaScript content. amCharts saves you from this trouble by letting you create code. Nine types of charts are available: XY chart, pie chart, sliced chart, sankey diagram, radar chart, gauge chart, chord diagram, treemap and map. In the plugin settings area, you can choose whether resources are stored remotely or locally. You can also add custom resources to the existing extensive list of Javascript libraries.
The post How To Use Graph and Chart Plugins appeared first on The Coding Bus.
from WordPress https://ift.tt/2zax8AI via IFTTT
0 notes
Text
Security Solutions for PHP
PHP is as secure a language as any other programming language. It’s an open source server side scripting language that has various attributes and frameworks which requires programmers to write and engineer secure applications.
In PHP there are several areas where security issues appear more frequently. Malicious users can exploit these vulnerabilities to gain sensitive information about your system or your users.
These vulnerabilities can include:
Injection
Broken Authentication
Sensitive Data Exposure
Broken Access control
Cross Site Scripting (XSS)
Insecure Deserialization
PHP also relies on several third-party libraries which can have security vulnerabilities. If the application is using the vulnerable library version, then the application also may be vulnerable too.
Injection
A code injection happens when an attacker sends invalid data to the web application with the intention to make it do something that the application was not designed/programmed to do.
Perhaps the most common example around this security vulnerability is the SQL query consuming untrusted data. You can see one example below:
String query = “SELECT * FROM accounts WHERE custID = ‘” + request.getParameter(“id”) + “‘”;
This query can be made use of by calling up the web page executing it with the following URL: http://example.com/app/accountView?id=’ or ‘1’=’1 causing the return of all the rows stored on the database table.
The core of a code injection is the lack of validation of the data used by the web applications which means that this weakness can be present on almost any type of technology.
Following are the recommendations to prevent SQL injections
Use positive or “whitelist” server-side input validation.
For any residual dynamic queries, escape special characters using the specific escape syntax for that interpreter.
Use LIMIT and other SQL controls within queries to prevent mass disclosure of records in case of SQL injection.
Broken Authentication
A broken authentication can allow an attacker to use manual and/or automatic methods to try to gain control over any account they want in a system — or even worse — to gain complete control over the system. These threats can come in many forms. A web application contains a broken authentication threats if it:
Permits automated threats such as credential stuffing, where the hacker has a list of valid usernames and passwords.
Permits brute force or other automated threats.
Permits default, weak, or well-known common passwords.
Uses common text, encrypted, or weakly hashed passwords.
Has missing or ineffective multi-factor authentication.
Shown session IDs in the URL (e.g., URL rewriting).
Following are the recommended preventive measures.
Where the other possible way is the implementation of multi-factor authentication to prevent automated, credential stuffing, brute force, and stolen credential reuse threats.
Do not ship or make use of any default credentials, particularly for admin users.
Implement weak-password checks
Use a server-side, secure, built-in session manager that generates a new random session ID with high entropy after login. Session IDs should not be in the URL. Ids should also be securely stored and invalidated after logout, idle, and absolute timeouts.
Sensitive Data Exposure
Over the last few years, sensitive data exposure has been one of the most common threat around the world. Some sensitive data that needs protection is Credentials, Credit card numbers, Social Security Numbers, Medical information, Personally, identifiable information (PII), Other personal information. This threat is usually very hard to make use of; however, the consequences of a successful attack are dreadful.
There are two types of data:
Stored data — data at rest
Transmitted data — data that is transmitted internally between servers, or to web browsers
Both types of data should be protected. When thinking about data in transit, one way to protect it on a website is by having an SSL certificate. Not encrypting sensitive data is the main reason why these attacks are still so widespread.
Some of the ways to prevent data exposure are:
Do not store sensitive data unnecessarily.
Discard it as soon as possible or use PCI DSS compliant tokenization or even shorten. Data that is not retained cannot be stolen.
Make sure to encrypt all possible sensitive data at rest.
Ensure up-to-date and strong standardized algorithms, protocols, and keys are in place; use proper key management.
Disable caching for responses that contain sensitive data.
Store passwords using strong adaptive and salted hashing functions with a work factor (delay factor), such as bcrypt
Broken Access Control
Access controls are mainly designed to prevent users from acting outside their intended permissions, when threats exist in these controls, or there are no controls users can act outside of their intended permissions. This may help attackers to steal information from other users, modify data and perform actions as other users. Broken access controls can make applications at a high-risk for compromise, typically resulting in the impact of confidentiality and integrity of data. An adversary can steal information accessed by users of the application, exploit data by performing actions that various user roles can perform within the application, and in certain circumstances compromise the web server.
Common access control vulnerabilities include:
Bypassing access control ensure by modifying the URL, internal application state, or the HTML page, or simply using a custom API attack tool
providing the primary key to be changed to another’s users record, permitting viewing or editing someone else’s account.
upgrading of privilege.
Metadata exploitation, such as replaying or tampering with a JSON Web Token (JWT) access control token or a cookie or hidden field exploited to elevate privileges, or abusing JWT invalidation
CORS misconfiguration allows unauthorized API access.
Force browsing to authenticated pages as an unauthenticated user or to advanced pages as a standard user. Entering API with missing access controls for POST, PUT and DELETE.
The technical recommendations to prevent broken access control are:
Except for public resources, deny by default.
Executing access control mechanisms once and reuse them throughout the application, including minimizing CORS usage.
Model access controls should enforce record ownership instead of accepting that the user can create, read, update, or delete any record.
Defuse web server directory listing and ensure file metadata (e.g. git) and backup files even if they are not present within web roots.
Maintain log access control failures, alert admins when appropriate (e.g. repeated failures).
Developers and QA staff should include functional access control units and integration tests.
Cross-Site Scripting (XSS)
Cross-Site Scripting (XSS) is the most used common singular security threat existing in web applications at large. XSS occurs when an attacker can inject a script, often JavaScript, into the output of a web application in such a way that it is executed in the client browser. This ordinarily happens by locating a means of breaking out of a data context in HTML into a scripting context — usually by injecting new HTML, JavaScript strings or CSS markup. HTML has no shortage of locations in which executable JavaScript can be injected and browsers have even managed to add more. The injection is sent to the web application via any means of input such as HTTP parameters.
Injected JavaScript can be used to accomplish quite a lot: stealing cookie and session information, performing HTTP requests with the user’s session, redirecting users to hostile websites, accessing and manipulating client-side persistent storage, performing complex calculations and returning results to an attacker’s server, attacking the browser or installing malware, leveraging control of the user interface via the DOM to perform a UI Redress (aka Clickjacking) attack, rewriting or manipulating in-browser applications, attacking browser extensions, and the list goes on…possibly forever.
Some preventive measures to reduce the chances of XSS attacks:
Using the frameworks that automatically escape XSS by design.
Escaping untrusted HTTP request data based on the context in the HTML output will resolve Reflected and Stored XSS vulnerabilities.
Put in context-sensitive encoding when modifying the browser document on the client side acts against DOM XSS.
Allowing a content security policy (CSP) is a defense-in-depth mitigating control against XSS.
Insecure Deserialization
There should be a way to transform the in-memory object into a stream of bytes which can be easily stored and shared. That is what the process of serialization is all about. When the game performs the serialization of an object, we say that the object is serialized.

The following function in php to perform the mutation of object to bytes is as follows:
$my_object = serialize($variable);
Deserialization is the opposite of serialization. In fact, it consists of converting the serialized data into an in-memory representation which the software can then manipulate. If we want to retrieve the state of the serialized character object, it needs to deserialize it first.

The following function in php to perform the mutation from bytes to object is as follows:
$my_bytes = unserialize($variable);
When a software deserializes user-maintained data without verification, we call it insecure deserialization. If the developer does not perform a verification before deserialization, the insecure deserialization will trigger the attacker’s code.
The best way to protect your web application from this type of risk is not to accept serialized objects from untrusted sources.
Following are some recommendations that you can try to implement:
Performing integrity checks such as digital signatures on any serialized objects to prevent hostile object creation or data tampering.
Impose strict type constraints during deserialization before object creation as the code typically expects a definable set of classes.
Separating and running code that deserializes in low privilege environments when possible.
Logging exceptions and failures, such as where the incoming type is not the expected type, or the deserialization throws exceptions.
Limiting or monitoring incoming and outgoing network connectivity from containers or servers that deserialize.
Monitoring deserialization, alerting if a user deserializes constantly.
Conclusion
Security vulnerabilities are a fact of life. While a security breach can be damaging to your business, there are plenty of ways you can protect your PHP sites and mitigate your risk that don’t require you to be a security genius with the right training, awareness, tools, and practices, you can safely run PHP applications today and in future .

For more information on the topic go to PHP.
0 notes
Link
What is HTML?
HTML forms the basis of any website you see out there. Whether that's tharunshiv.com, google.com or amazon.com . Fortunately, it doesn't take much time to master HTML. I will list the most essential topics of HTML in this article which will help you kickstart your HTML knowledge or revise the essential topics.
5 essential topics
1. The Basic syntax & elements
This is an example of a basic HTML webpage which shows the heading and a line of text.
<html> <head> <title>My First WebPage</title> </head> <body> <h1>Welcome Buddy!</h1> <p>It's fun building websites</p> </body> </html>
So, HTML is written using tags that are nested. It consists of elements that have specific properties. Know the various elements that exist, know at least a few of the majorly used tags. Some of the most frequently used elements are h1, p, img, form, table, ul, ol, div, span.
2. Class | id
Know when you have to use class versus when to use an id. A class is used when you have to target many elements. An id is used when you want to target a unique element. This means, many elements can have the same class name, but only one element must have that unique id. Classes and ids are used in the following situations:
To style a group of elements
To style a single element
To change the value of the element
To add a new element relative to this element and more... A class is preceded with a '.' (full-stop) An id is preceded with a '#'
3. Adding Stylesheets
A plain HTML page is boring nowadays, compared to the level of creative web designers exhibit nowadays. So in order to create something colorful, give some designs to it, we would definitely need to use Styling to our website. This would involve CSS - Cascading Style Sheets. There 3 ways to use CSS to an HTML website.
Inline: The styles are written within the tags
Internal: the styles are written in the same HTML page
External: The styles are written in an external file and used by one or more HTML page
When you use all three of these on the same element, the priority goes like Inline first, Internal second and then external. Pro Tip: You can force an element to use a style when mentioned anywhere in these irrespective of the priority by using the ! symbol. Although it is not recommended to use this often, as this will slow down the page.
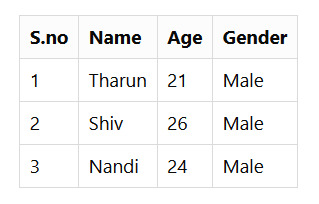
4. Tables in HTML
You might think tables are outdated and no one uses it nowadays. This is not true. Tables are being used in many parts of the website like the forms, tabular display of the contents, aligning content conveniently. Tables can be created using the original <table> tag and styling it on your own or by using the CSS Frameworks like Bootstrap or Materialize CSS to style the table easily. The table rows can also be dynamically generated by combining HTML with JavaScript (not necessary as a beginner).
<table> <tr> <th>S.no</th> <th>Name</th> <th>Age</th> <th>Gender</th> </tr> <tr> <td>1</td> <td>Tharun</td> <td>21</td> <td>Male</td> </tr> <tr> <td>2</td> <td>Shiv</td> <td>26</td> <td>Male</td> </tr> <tr> <td>3</td> <td>Nandi</td> <td>24</td> <td>Male</td> </tr> </table>
The above code results in the following table
5. Meta Tags
As a beginner, it is okay to ignore the meta tags. But as you start working on projects in web development where you want it to work on all sizes of desktops, on mobile phones, when you are deploying the website to the World Wide Web such that it appears on search engines like Google, you will definitely need to know about the meta tags.
Let's break it down, what does meta mean? Meta means data about data. So these meta tags are nothing but some data about our web page. Some of the stuff that you can do using meta tags is, you can set your website as a responsive website which will scale according to the display screen, you can add the tags related to the page, you can specify the author of the webpage, you can specify the encoding of the web page and many more. Just spend a few minutes going through the available meta tags so that you can google them and use it when you need them for your projects.
So these are the majority of the topics which you need to be aware of, before jumping into CSS and JavaScript. Feel free to reach out to me for any doubts on them.
0 notes
Text
The Ultimate Guide To CSS Grid
You are probably already familiar with CSS "box model." Let’s begin this CSS grid tutorial with a similar bird’s eye view representation for the CSS Grid.
All diagrams taken from my CSS Visual Dictionary book.
You can get it here bundled together with JavaScript Grammar.
Or you can just follow me on Twitter where I share more of my tutorials.
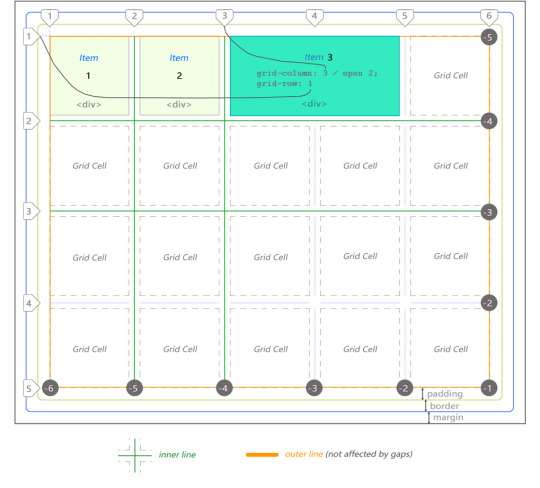
CSS Grid Anatomy is composed of the primary container which is just your standard <div> element that has a margin, border and padding. To make a parent CSS grid container out of any element add display: grid to it. Grid’s items are children nested inside the parent container. They are usually defined as a list of elements that could represent a header, sidebar, footer or similar website layout elements, depending on your application design.
In this case there are 3 <div> items. Third one is stretched across 2 cells.
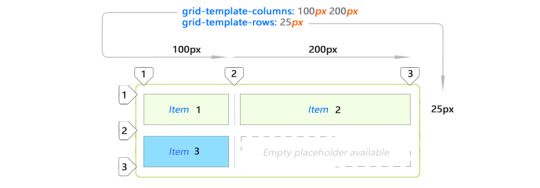
Notice lines can be counted backwards too using negative coordinate system.
The grid above is 5 by 4cells in dimension. It is defined as follows:
div#grid { /* This is our CSS grid parent container */ display: grid; grid-template-columns: 100px 100px 100px 100px 100px; /* 5 cols */ grid-template-rows: 100px 100px 100px 100px; /* 4 rows */ }
Number of rows and columns is assumed implicitly by number of values set.
In between each cell there is a line and an optional gap.
Rows and columns between the lines are referred to as grid’s tracks.
There are always [cell + 1] lines per dimension.
Therefore 5 columns will have 6 lines whereas 4 rows will have 5 lines.
In the following example there are 7 columns and only 1 row:
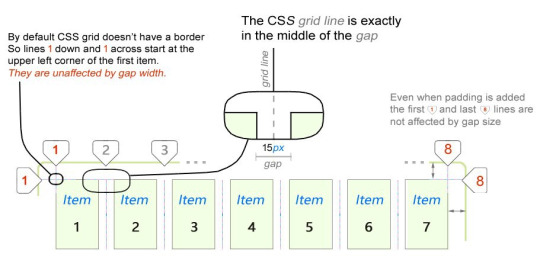
The first important thing you will notice about CSS grid is that outer lines are not affected by gap size. Only inner lines. We will take a deeper dive into this a bit later in this tutorial when we look at fractional (fr) units.
The CSS grid is bi-directional. Its items can flow either horizontally (column) or vertically (row). Set the value with grid-auto-flow property.
It works kind of like Flex:

Think about the grid in this abstract way:

Okay — so we got the basic idea of how it works.
The creative part comes in when you are faced with the problem of actually juggling the item placements to create a sensible application layout. CSS Grid offers several properties to accomplish just that. We’ll take a look at them in the next section in this tutorial in just a moment.
Let’s cement our knowledge so far by looking at these examples:
I only used two <div> elements for the items. Hence, the grid above.
Implicit and Explicit Content Placement
But what happens if we add one more item to the list?
Adding item 3 to the same layout will automatically extend it (blue item.)
This new spacing is created automatically by copying values from first row.
Let’s add Item 4 shall we?

And again our CSS grid has made a decision to stretch Item 4 across the remaining space on second row. This is because grid-template-rows specified enough space only for 1 row. The rest are automatic.
Placement of blue items is not explicitly specified by you. This is implicit (automatic) placement. They kind of just fall into that space.
Explicit Content Placement
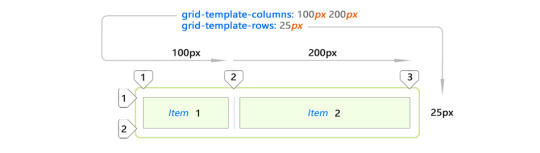
This is just what you would expect from grid cells if you set custom values for all items on the list:

Basically you can gain control over the space on all consecutive rows by adding more values to grid-template-rows property. Notice the items are no longer implicit here. You defined them to be exact. (25px 75px)
Automatic Spacing
CSS grid offers a few properties to automatically stretch its cells across variable / unknown amount of space.
Here are the key examples for both column and row auto flow cases:

The bottom example demonstrates the usage of auto keyword. This just means that cell will stretch to fill up however much space is left in parent container after it has already been populated by explicitly placed items.
CSS Grid Gaps
Talking about CSS grid you can’t escape talking about gaps. Gaps are the horizontal and vertical spaces between grid cells.
#grid { grid-column-gap: 15px; grid-row-gap: 15px; }
Gaps are controlled using grid-column-gap and grid-row-gap properties:

You can use varying gaps in both dimensions. perhaps this can be useful for creating video or image galleries:
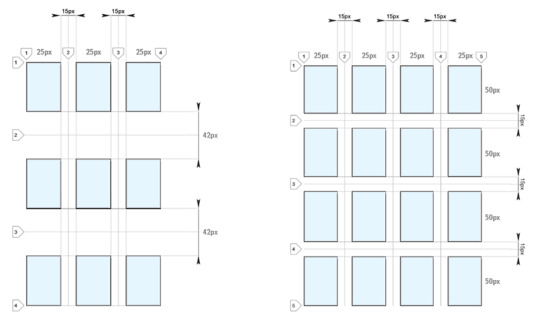
Gaps across dimensions (columns and rows) can differ in size. But gap size is specified once for all gaps in the grid in a given dimension. As you can see here — gaps of varying sizewithin the same dimension are not allowed:

I really wish varying size gaps were possible. I can see how this can actually be useful. Some suggest to use empty tracks in order to achieve a similar effect.
FR units (Fractional Units)
Fractional (fr) units are unique to CSS grid.
#grid { grid-template-columns: 1fr 1fr 1fr }
A fractional unit allocates relative to all other elements in the parent:
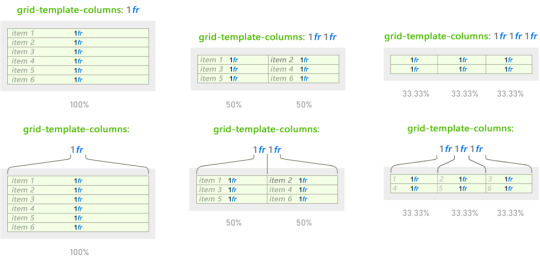
The behavior changes but 1fr remains the same regardless whenever different values are used. Fractional units work similar to % values but they are easier and more intuitive to divide space with:
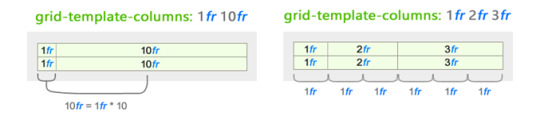
Behavior of fractional units (fr unit) changes based on all values provided in either dimension.
In this example only column-wise behavior is shown for simplicity’s sake. But it works the same for rows too. Simply use grid-template-rows property.
Fractional Units / Their Relationship To Gaps
Space defined using fractional units changes based on gaps. The same 1fr within the same parent will shrink to a smaller size when gaps are added:
Space defined using fractional units changes based on gaps. The same 1fr within the same parent will shrink to a smaller size when gaps are added:

Here we added gaps to cells specified using fr units.
As you can see, this gives you a pretty good set of properties to space content basically in any way you wish without worrying about pixel values.
These new dynamics render pixel-perfect design as a thing of the past. We will now think about layout design using the intuitive approach!
Finally, to give you a better idea of using non-whole fractional units here is a fun grid I created. You can specify them using floating point numbers too:

#grid { grid-template-rows: 1fr 1fr 1.4fr 2.0fr 2.5fr 2.0fr 1.5fr 1fr grid-template-columns: 1fr 1fr 1.5fr 2.0fr 2.5fr 2.0fr 1.5fr 1fr }
Content Placement
We’ve just dissected the CSS grid anatomy. Hopefully you get a better idea of how CSS grid structures content. But now we need to get creative and actually place some items inside it. How it’s done might modify default behavior of the CSS grid. We’ll explore how this happens in this section.
To arrange your items across cells or template areas on the grid you will refer to them by lines between cells. Not <table>-like spans.
CSS grid does allow using spans for determining width and height of the content area (in cell space) just like tables. We’ll explore that in just a bit. But you still can and probably should specify the starting cell using line numbers or named lines (more on this in a bit.) This depends on your preference..
As far as content placement across multiple cells goes the most obvious and tempting thing is cell spanning.
Cell Content Spanning
You can span an item across multiple cells.
Important: Spanning changes location of the surrounding items.
Spanning using grid-column and grid-row
Using grid-column and grid-row properties on the item element itself:
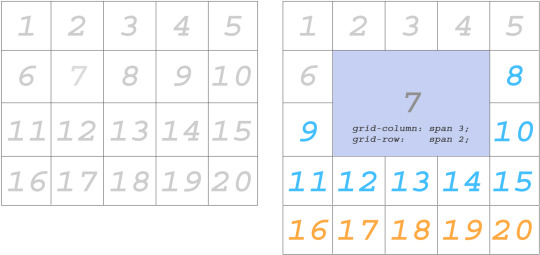
The blue items changed location after making Item 7 span across multiple cells. And orange items were bumped down a row.
There is also another way of doing the same thing…
Spanning using grid-column-start…
…grid-column-end, grid-row-start and grid-row-end you can specify actual starting and ending points across which you want to span cell content.
I removed the items past 15 (orange ones) because we no longer need them:
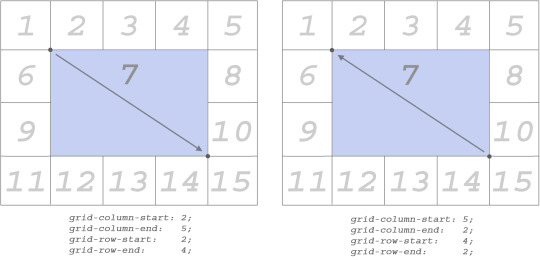
Type these properties directly into the item you wish to be affected by them.
Stretching content across column and row lines works in both directions.
min-content and max-content
The values min-content and max-content are supplied to grid-template-columns or grid-template-rows properties just like any other size-related value (for example px, 1fr, etc.)

Let’s take a look at this specimen. It is our starting point. We’ll change things around a bit to see how min/max values affect cells.
Let’s see what type of results will be produced if we switch one of the columns to min-content and max-content:

With one-word text there’s no difference between the results observed whether we use min-content or max-content. Here it is because hello is a single word. Its min and max values are exactly the same.
But things get interesting with more complex text. The following example will demonstrate the basic idea behind min-content and max-content:

Here min-content used longest word in the sentence (stranger) as base width.
When using max-content the entire text string with spaces filled the space.
But what happens if we apply min-content or max-content to all cells?

I noticed that by default the text was centered whenever I used min-content on it although text-align: center was not set on the item.
Images and max-content
I placed the image of this blue rose into the cell.
And just as expected, the grid expanded to allocate enough space:
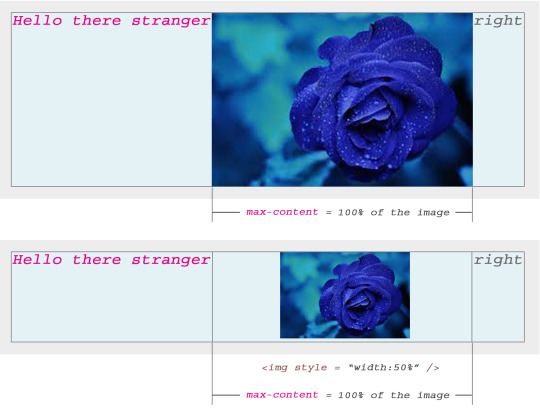
When I explicitly set the width of the image to 50% just to see what happens CSS Grid still kept cell width to 100% of the image but displayed image at 50% width (as expected) and auto-centered it horizontally within the cell.
Both text and images (or any content) will be automatically centered within CSS Grid’s cells by default.
Content Positioning
Up until this point we’ve talked about Grid’s structure in general.
In the next section, we’ll take a look at how to achieve “multi-directional” float inside cells. We won’t be using float property here of course.
Multi-directional 360° float
I don’t think CSS Grid specification calls it that. But, indeed it is possible to create exactly that… a 360-degree floating behavior.
This works on both inline and blocking elements! And I think this is my favorite feature from the entire CSS Grid’s set of abilities.

All 9 combinations are possible using align-self and justify-self properties.
They are explained below.
Align Self (align-self)
This property helps you position content vertically.

Use align-self: start to align content to the upper edge of the cell.
Use align-self: center to align content to its vertical middle.
Use align-self: end to align content to the bottom of the cell.
Justify Self (justify-self)
This property helps you position content horizontally.

Use justify-self: start to align content to the left edge of the cell.
Use justify-self: center to align content to its horizontal middle.
Use justify-self: end to align content to the right edge of the cell.
You can use any of the 9 justify-self x align-self combinations to align anything anywhere aka multi-directional float.
Template Areas
Template areas are defined using grid-template-areas property.

Note, template areas for each row are enclosed in double quotes.
Each column is separated by space.
In this example I simply explained how to name ares. To take real advantage of template areas you need to categorize rectangular blocks of cells by same name.
Tetris blocks are not allowed. You can only use rectangles:

Here Left is one area spanning 3 cells down. CSS Grid automatically treats it as a single block. The same goes for Right. In this simple example I created two columns. But you get the idea. Block out larger areas by naming them.
To place an item into that area simply add grid-area: TemplateName. In this case it is grid-area: Left or grid-area: Right.
Template area names cannot use spaces. I used dashes here.
Practical Example of CSS Grid Template Areas
We now understand how to block out rectangular areas. Let’s take a look at a potentially real-world scenario. Here I’ll demonstrate a very basic layout.
I blocked a very simple website layout with two sidebars, a header and footer areas. The main area is in the center occupying 3 x 2 cell space:

grid-template-areas: 'z y y y y' 'x center center center w' 'x center center center w' 'x z z z z';
Grid template areas, CSS style.
<div id = "grid"> <div style = "grid-area: x">Left</div> <div style = "grid-area: y">Header</div> <div style = "grid-area: z">Footer</div> <div style = "grid-area: w">Right</div> <div style = "grid-area: center">Main</div> </div>
HTML
We only need 5 items here. Add any more and they would be pushed outside of the main grid area into implicit cells.
Just make sure to always keep your areas square or rectangular.
Naming Lines
Instead of always referring to lines by their number, you can also name them. This way they will be easy to remember for stretching items across multiple cells. Numbers can get tedious!
Below is a representation of what it looks like:

Use square brackets to name your lines. Then use these names when specifying the length your items need to span across using / slash.
Use Cases
Your layout depends on purpose of your website.
Now that we know basic CSS grid features let's apply them in a practical example.
We'll build a mobile-first layout using the following guidelines:

Basic Ideas Behind Column Division
I tried to figure out what we actually gain from each column division.
One-column designs help us put all of our content into long vertical list.
Two-column designs are okay for mini (tablet?) image galleries/portfolios.
Tree-column designs are the first of its kind to offer borders (margins).
Four-column designs work well as full-screen image galleries.
I noticed odd-number column layouts (≥ 1) work for border-based layouts.
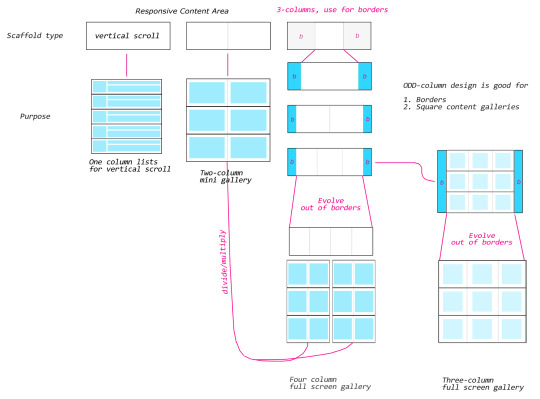
Use fr units to make them expand like you would margin: auto on regular elements. It doesn’t matter if it’s 1fr or 2fr or n-fr for borders, as long as the primary content is specified using pixels or a large(r) fr value (10fr,20fr, etc):

The only difference here is that Medium uses 1000px for wide content and 700px for main article column. But the idea is the same.
Responsive Grid and Going Mobile
So far we created the primary scaffold. But what about responsive design?
CSS Grid makes things easier than you think!

Remember: responsive content != responsive borders. The two techniques should be dealt with separately. But… Often — as in this case — it is possible to solve the responsive content problem by solving the responsive border problem.
If you can use your creativity to solve multiple problems by using one technique… all the better. Having said this, in this case, we can solve it simply by switching outer lanes of your template to 0.5fr (the purple and blue ones.) Also, switching either span or the template areas to expand into multiple columns making wide content space. (The pink area above.) You can do this via media queries or JavaScript.
Finally… change the main lane (green) to 10fr. (You can use a similar value, but ≥10 usually will work fine.) This will automatically scale your main (green) lane to the current screen resolution. Since both borders are now 0.5fr, everything including borders and content will scale properly.
If you need to remove 0.5fr borders completely, you can set them to 0fr. But I personally like to have a tiny border on mobile views. It just makes the content lane look better in my opinion.

Once all of the steps above are followed… When squeezed to a smaller space you should arrive at something like this (shown above.)
Lesson Learned Here?
Always try to find the most graceful solution. Meaning, it’s clean, uncomplicated, and if possible solves multiple problems by applying a single change (or two.) This is not as hard as it may sound.
Is this the only solution? No.
Is this a perfect solution? No.
But it solves the problem, and it works — sufficiently enough for creating simple mobile layouts.
And all that is a good thing to aim for. The approach shown in this tutorial is:
1. More rewarding & fun 2. It’s respectable. 3. It invites you to actually understand how and why something works. 4. It’s simple. Hence, creates easy-to-maintain code. 5. It produces clean code. 6. Keeps your conscience clean.
Speaking of which… otherwise… you might start “hacking” code. (Trying to solve problems by trial and error, often without understanding how it actually works.) You will still get things done this way. And probably even feel accomplishment of some sorts. But… it won’t be any fun.
In Conclusion
CSS Grid is a comprehensive subject. Hence, this is not a complete CSS Grid tutorial on how to build actual CSS layouts. I simply used one example for each separate part as a starting point for someone new to the grid.
Hopefully information here was insightful and inspired interest in building websites using CSS Grid.
CSS Grid isn’t just an HTML element. It’s an entire system for building responsive websites and web applications.
Its properties and values describe the conglomerate of techniques learned from over a decade building websites using common HTML tags.
Want To See All CSS Properties Explained Visually?
All diagrams taken from my CSS Visual Dictionary book.
You can get it here bundled together with JavaScript Grammar.
Or you can just follow me on Twitter where I share more of my tutorials.
via freeCodeCamp.org https://ift.tt/2xcBQNy
0 notes
Text
Rethinking Twitter as a Serverless App
In a previous article, we showed how to build a GraphQL API with FaunaDB. We’ve also written a series of articles [1, 2, 3, 4] explaining how traditional databases built for global scalability have to adopt eventual (vs. strong) consistency, and/or make compromises on relations and indexing possibilities. FaunaDB is different since it does not make these compromises. It’s built to scale so it can safely serve your future startup no matter how big it gets, without sacrificing relations and consistent data.
In this article, we’re very excited to start bringing all of this together in a real-world app with highly dynamic data in a serverless fashion using React hooks, FaunaDB, and Cloudinary. We will use the Fauna Query Language (FQL) instead of GraphQL and start with a frontend-only approach that directly accesses the serverless database FaunaDB for data storage, authentication, and authorization.

The golden standard for example applications that feature a specific technology is a todo app–mainly because they are simple. Any database out there can serve a very simple application and shine.
And that is exactly why this app will be different! If we truly want to show how FaunaDB excels for real world applications, then we need to build something more advanced.
Introducing Fwitter
When we started at Twitter, databases were bad. When we left, they were still bad
Evan Weaver
Since FaunaDB was developed by ex-Twitter engineers who experienced these limitations first-hand, a Twitter-like application felt like an appropriately sentimental choice. And, since we are building it with FaunaDB, let’s call this serverless baby ‘Fwitter’.
Below is a short video that shows how it looks, and the full source code is available on GitHub.
When you clone the repo and start digging around, you might notice a plethora of well-commented example queries not covered in this article. That’s because we’ll be using Fwitter as our go-to example application in future articles, and building additional features into it with time.
But, for now, here’s a basic rundown of what we’ll cover here:
Modeling the data
Setup the project
Creating the front end
The FaunaDB JavaScript driver
Creating data
Securing your data with UDFs and ABAC roles
How to implement authentication
Adding Cloudinary for media
Retrieving data
More in the code base
We build these features without having to configure operations or set up servers for your database. Since both Cloudinary and FaunaDB are scalable and distributed out-of-the-box, we will never have to worry about setting up servers in multiple regions to achieve low latencies for users in other countries.
Let’s dive in!
Modeling the data
Before we can show how FaunaDB excels at relations, we need to cover the types of relations in our application’s data model. FaunaDB’s data entities are stored in documents, which are then stored in collections–like rows in tables. For example, each user’s details will be represented by a User document stored in a Users collection. And we eventually plan to support both single sign-on and password-based login methods for a single user, each of which will be represented as an Account document in an Accounts collection.
At this point, one user has one account, so it doesn’t matter which entity stores the reference (i.e., the user ID). We could have stored the user ID in either the Account or the User document in a one-to-one relation:

One-to-one
However, since one User will eventually have multiple Accounts (or authentication methods), we’ll have a one-to-many model.

One-to-many
In a one-to-many relation between Users and Accounts, each Account points to only one user, so it makes sense to store the User reference on the Account:

We also have many-to-many relations, like the relations between Fweets and Users, because of the complex ways users interact with each other via likes, comments, and refweets.

Many-to-many
Further, we will use a third collection, Fweetstats, to store information about the interaction between a User and a Fweet.

Fweetstats’ data will help us determine, for example, whether or not to color the icons indicating to the user that he has already liked, commented, or refweeted a Fweet. It also helps us determine what clicking on the heart means: unlike or like.

The final model for the application will look like this:
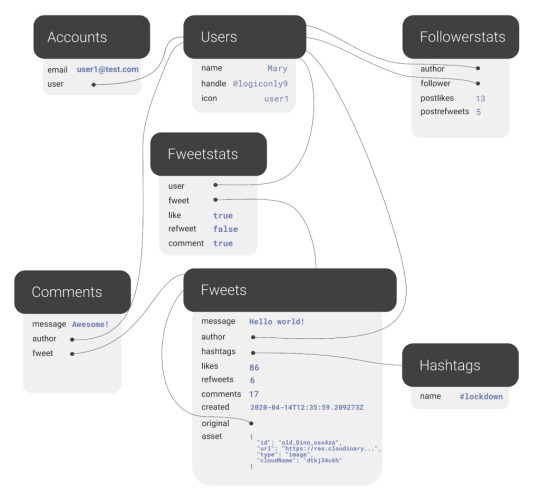
The application model of the fwitter application
Fweets are the center of the model, because they contain the most important data of the Fweet such as the information about the message, the number of likes, refweets, comments, and the Cloudinary media that was attached. FaunaDB stores this data in a json format that looks like this:

As shown in the model and in this example json, hashtags are stored as a list of references. If we wanted to, we could have stored the complete hashtag json in here, and that is the preferred solution in more limited document-based databases that lack relations. However, that would mean that our hashtags would be duplicated everywhere (as they are in more limited databases) and it would be more difficult to search for hashtags and/or retrieve Fweets for a specific hashtag as shown below.
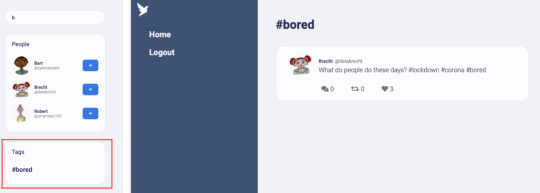
Note that a Fweet does not contain a link to Comments, but the Comments collection contains a reference to the Fweet. That’s because one Comment belongs to one Fweet, but a Fweet can have many comments–similar to the one-to-many relation between Users and Accounts.
Finally, there is a FollowerStats collection which basically saves information about how much users interact with each other in order to personalize their respective feeds. We won’t cover that much in this article, but you can experiment with the queries in the source code and stay tuned for a future article on advanced indexing.
Hopefully, you’re starting to see why we chose something more complex than a ToDo app. Although Fwitter is nowhere near the complexity of the real Twitter app on which it’s based, it’s already becoming apparent that implementing such an application without relations would be a serious brainbreaker.
Now, if you haven’t already done so from the github repo, it’s finally time to get our project running locally!
Setup the project
To set up the project, go to the FaunaDB dashboard and sign up. Once you are in the dashboard, click on New Database, fill in a name, and click Save. You should now be on the “Overview” page of your new database.
Next, we need a key that we will use in our setup scripts. Click on the Security tab in the left sidebar, then click the New key button.
In the “New key” form, the current database should already be selected. For “Role”, leave it as “Admin”. Optionally, add a key name. Next, click Save and copy the key secret displayed on the next page. It will not be displayed again.

Now that you have your database secret, clone the git repository and follow the readme. We have prepared a few scripts so that you only have to run the following commands to initialize your app, create all collections, and populate your database. The scripts will give you further instructions:
// install node modules npm install // run setup, this will create all the resources in your database // provide the admin key when the script asks for it. // !!! the setup script will give you another key, this is a key // with almost no permissions that you need to place in your .env.local as the // script suggestions npm run setup npm run populate // start the frontend
After the script, your .env.local file should contain the bootstrap key that the script provided you (not the admin key)
REACT_APP_LOCAL___BOOTSTRAP_FAUNADB_KEY=<bootstrap key>
You can optionally create an account with Cloudinary and add your cloudname and a public template (there is a default template called ‘ml_default’ which you can make public) to the environment to include images and videos in the fweets.
REACT_APP_LOCAL___CLOUDINARY_CLOUDNAME=<cloudinary cloudname> REACT_APP_LOCAL___CLOUDINARY_TEMPLATE=<cloudinary template>
Without these variables, the include media button will not work, but the rest of the app should run fine:
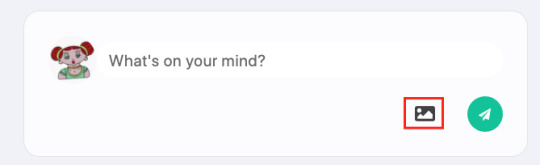
Creating the front end
For the frontend, we used Create React App to generate an application, then divided the application into pages and components. Pages are top-level components which have their own URLs. The Login and Register pages speak for themselves. Home is the standard feed of Fweets from the authors we follow; this is the page that we see when we log into our account. And the User and Tag pages show the Fweets for a specific user or tag in reverse chronological order.
We use React Router to direct to these pages depending on the URL, as you can see in the src/app.js file.
<Router> <SessionProvider value=> <Layout> <Switch> <Route exact path="/accounts/login"> <Login /> </Route> <Route exact path="/accounts/register"> <Register /> </Route> <Route path="/users/:authorHandle" component={User} /> <Route path="/tags/:tag" component={Tag} /> <Route path="/"> <Home /> </Route> </Switch> </Layout> </SessionProvider> </Router>
The only other thing to note in the above snippet is the SessionProvider, which is a React context to store the user’s information upon login. We’ll revisit this in the authentication section. For now, it’s enough to know that this gives us access to the Account (and thus User) information from each component.
Take a quick look at the home page (src/pages/home.js) to see how we use a combination of hooks to manage our data. The bulk of our application’s logic is implemented in FaunaDB queries which live in the src/fauna/queries folder. All calls to the database pass through the query-manager, which in a future article, we’ll refactor into serverless function calls. But for now these calls originate from the frontend and we’ll secure the sensitive parts of it with FaunaDB’s ABAC security rules and User Defined Functions (UDF). Since FaunaDB behaves as a token-secured API, we do not have to worry about a limit on the amount of connections as we would in traditional databases.
The FaunaDB JavaScript driver
Next, take a look at the src/fauna/query-manager.js file to see how we connect FaunaDB to our application using FaunaDB’s JavaScript driver, which is just a node module we pulled with `npm install`. As with any node module, we import it into our application as so:
import faunadb from 'faunadb'
And create a client by providing a token.
this.client = new faunadb.Client({ secret: token || this.bootstrapToken })
We’ll cover tokens a little more in the Authentication section. For now, let’s create some data!
Creating data
The logic to create a new Fweet document can be found in the src/fauna/queries/fweets.js file. FaunaDB documents are just like JSON, and each Fweet follows the same basic structure:
const data = { data: { message: message, likes: 0, refweets: 0, comments: 0, created: Now() } }
The Now() function is used to insert the time of the query so that the Fweets in a user’s feed can be sorted chronologically. Note that FaunaDB automatically places timestamps on every database entity for temporal querying. However, the FaunaDB timestamp represents the time the document was last updated, not the time it was created, and the document gets updated every time a Fweet is liked; for our intended sorting order, we need the created time.
Next, we send this data to FaunaDB with the Create() function. By providing Create() with the reference to the Fweets collection using Collection(‘fweets’), we specify where the data needs to go.
const query = Create(Collection('fweets'), data )
We can now wrap this query in a function that takes a message parameter and executes it using client.query() which will send the query to the database. Only when we call client.query() will the query be sent to the database and executed. Before that, we combine as many FQL functions as we want to construct our query.
function createFweet(message, hashtags) { const data = … const query = … return client.query(query) }
Note that we have used plain old JavaScript variables to compose this query and in essence just called functions. Writing FQL is all about function composition; you construct queries by combining small functions into larger expressions. This functional approach has very strong advantages. It allows us to use native language features such as JavaScript variables to compose queries, while also writing higher-order FQL functions that are protected from injection.
For example, in the query below, we add hashtags to the document with a CreateHashtags() function that we’ve defined elsewhere using FQL.
const data = { data: { // ... hashtags: CreateHashtags(tags), likes: 0, // ... }
The way FQL works from within the driver’s host language (in this case, JavaScript) is what makes FQL an eDSL (embedded domain-specific language). Functions like CreateHashtags() behave just like a native FQL function in that they are both just functions that take input. This means that we can easily extend the language with our own functions, like in this open source FQL library from the Fauna community.
It’s also important to notice that we create two entities in two different collections, in one transaction. Thus, if/when things go wrong, there is no risk that the Fweet is created yet the Hashtags are not. In more technical terms, FaunaDB is transactional and consistent whether you run queries over multiple collections or not, a property that is rare in scalable distributed databases.
Next, we need to add the author to the query. First, we can use the Identity() FQL function to return a reference to the currently logged in document. As discussed previously in the data modeling section, that document is of the type Account and is separated from Users to support SSO in a later phase.
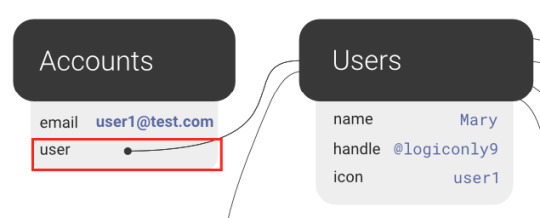
Then, we need to wrap Identity() in a Get() to access the full Account document and not just the reference to it.
Get(Identity())
Finally, we wrap all of that in a Select() to select the data.user field from the account document and add it to the data JSON.
const data = { data: { // ... hashtags: CreateHashtags(tags), author: Select(['data', 'user'], Get(Identity())), likes: 0, // ... } }
Now that we’ve constructed the query, let’s pull it all together and call client.query(query) to execute it.
function createFweet(message, hashtags) { const data = { data: { message: message, likes: 0, refweets: 0, comments: 0, author: Select(['data', 'user'], Get(Identity())), hashtags: CreateHashtags(tags), created: Now() } } const query = Create(Collection('fweets'), data ) return client.query(query) }
By using functional composition, you can easily combine all your advanced logic in one query that will be executed in one transaction. Check out the file src/fauna/queries/fweets.js to see the final result which takes even more advantage of function composition to add rate-limiting, etc.
Securing your data with UDFs and ABAC roles
The attentive reader will have some thoughts about security by now. We are essentially creating queries in JavaScript and calling these queries from the frontend. What stops a malicious user from altering these queries?
FaunaDB provides two features that allow us to secure our data: Attribute-Based Access Control (ABAC) and User Defined Functions (UDF). With ABAC, we can control which collections or entities that a specific key or token can access by writing Roles.
With UDFs, we can push FQL statements to the database by using the CreateFunction().
CreateFunction({ name: 'create_fweet', body: <your FQL statement>, })
Once the function is in the database as a UDF, where the application can’t alter it anymore, we then call this UDF from the front end.
client.query( Call(Function('create_fweet'), message, hashTags) )
Since the query is now saved on the database (just like a stored procedure), the user can no longer manipulate it.
One example of how UDFs can be used to secure a call is that we do not pass in the author of the Fweet. The author of the Fweet is derived from the Identity() function instead, which makes it impossible for a user to write a Fweet on someone’s behalf.
Of course, we still have to define that the user has access to call the UDF. For that, we will use a very simple ABAC role that defines a group of role members and their privileges. This role will be named logged_in_role, its membership will include all of the documents in the Accounts collection, and all of these members will be granted the privilege of calling the create_fweet UDF.
CreateRole( name: 'logged_in_role', privileges: [ { resource: q.Function('create_fweet'), actions: { call: true } } ], membership: [{ resource: Collection('accounts') }], )
We now know that these privileges are granted to an account, but how do we ‘become’ an Account? By using the FaunaDB Login() function to authenticate our users as explained in the next section.
How to implement authentication in FaunaDB

We just showed a role that gives Accounts the permissions to call the create_fweets function. But how do we “become” an Account?.
First, we create a new Account document, storing credentials alongside any other data associated with the Account (in this case, the email address and the reference to the User).
return Create(Collection('accounts'), { credentials: { password: password }, data: { email: email, user: Select(['ref'], Var('user')) } }) }
We can then call Login() on the Account reference, which retrieves a token.
Login( Match( < Account reference > , { password: password } ) )
We use this token in the client to impersonate the Account. Since all Accounts are members of the Account collection, this token fulfills the membership requirement of the logged_in_role and is granted access to call the create_fweet UDF.
To bootstrap this whole process, we have two very important roles.
bootstrap_role: can only call the login and register UDFs
logged_in_role: can call other functions such as create_fweet
The token you received when you ran the setup script is essentially a key created with the bootstrap_role. A client is created with that token in src/fauna/query-manager.js which will only be able to register or login. Once we log in, we use the new token returned from Login() to create a new FaunaDB client which now grants access to other UDF functions such as create_fweet. Logging out means we just revert to the bootstrap token. You can see this process in the src/fauna/query-manager.js, along with more complex role examples in the src/fauna/setup/roles.js file.
How to implement the session in React
Previously, in the “Creating the front end” section, we mentioned the SessionProvider component. In React, providers belong to a React Context which is a concept to facilitate data sharing between different components. This is ideal for data such as user information that you need everywhere in your application. By inserting the SessionProvider in the HTML early on, we made sure that each component would have access to it. Now, the only thing a component has to do to access the user details is import the context and use React’s ‘useContext’ hook.
import SessionContext from '../context/session' import React, { useContext } from 'react' // In your component const sessionContext = useContext(SessionContext) const { user } = sessionContext.state
But how does the user end up in the context? When we included the SessionProvider, we passed in a value consisting of the current state and a dispatch function.
const [state, dispatch] = React.useReducer(sessionReducer, { user: null }) // ... <SessionProvider value=>
The state is simply the current state, and the dispatch function is called to modify the context. This dispatch function is actually the core of the context since creating a context only involves calling React.createContext() which will give you access to a Provider and a Consumer.
const SessionContext = React.createContext({}) export const SessionProvider = SessionContext.Provider export const SessionConsumer = SessionContext.Consumer export default SessionContext
We can see that the state and dispatch are extracted from something that React calls a reducer (using React.useReducer), so let’s write a reducer.
export const sessionReducer = (state, action) => { switch (action.type) { case 'login': { return { user: action.data.user } } case 'register': { return { user: action.data.user } } case 'logout': { return { user: null } } default: { throw new Error(`Unhandled action type: ${action.type}`) } } }
This is the logic that allows you to change the context. In essence, it receives an action and decides how to modify the context given that action. In my case, the action is simply a type with a string. We use this context to keep user information, which means that we call it on a successful login with:
sessionContext.dispatch({ type: 'login', data: e })
Adding Cloudinary for media
When we created a Fweet, we did not take into account assets yet. FaunaDB is meant to store application data, not image blobs or video data. However, we can easily store the media on Cloudinary and just keep a link in FaunaDB. The following inserts the Cloudinary script (in app.js):
loadScript('https://widget.cloudinary.com/v2.0/global/all.js')
We then create a Cloudinary Upload Widget (in src/components/uploader.js):
window.cloudinary.createUploadWidget( { cloudName: process.env.REACT_APP_LOCAL___CLOUDINARY_CLOUDNAME, uploadPreset: process.env.REACT_APP_LOCAL___CLOUDINARY_TEMPLATE, }, (error, result) => { // ... } )
As mentioned earlier, you need to provide a Cloudinary cloud name and template in the environment variables (.env.local file) to use this feature. Creating a Cloudinary account is free and once you have an account you can grab the cloud name from the dashboard.
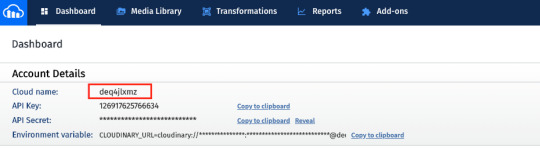
You have the option to use API keys as well to secure uploads. In this case, we upload straight from the front end so the upload uses a public template. To add a template or modify it to make it public, click on the gear icon in the top menu, go to Upload tab, and click Add upload preset.
You could also edit the ml_default template and just make it public.

Now, we just call widget.open() when our media button is clicked.
const handleUploadClick = () => { widget.open() } return ( <div> <FontAwesomeIcon icon={faImage} onClick={handleUploadClick}></FontAwesomeIcon> </div> )
This provides us with a small media button that will open the Cloudinary Upload Widget when it’s clicked.
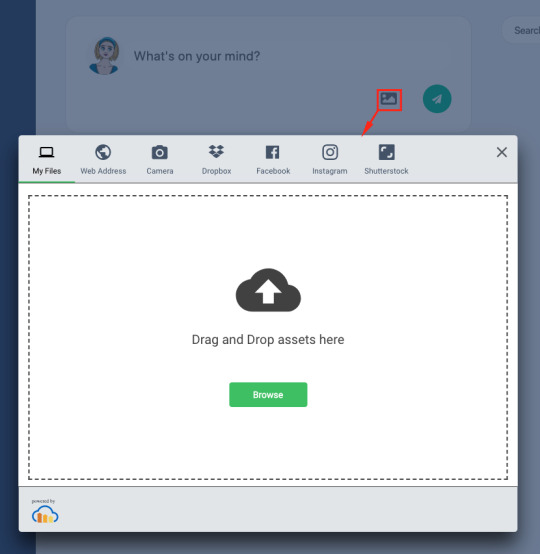
When we create the widget, we can also provide styles and fonts to give it the look and feel of our own application as we did above (in src/components/uploader.js):
const widget = window.cloudinary.createUploadWidget( { cloudName: process.env.REACT_APP_LOCAL___CLOUDINARY_CLOUDNAME, uploadPreset: process.env.REACT_APP_LOCAL___CLOUDINARY_TEMPLATE, styles: { palette: { window: '#E5E8EB', windowBorder: '#4A4A4A', tabIcon: '#000000', // ... }, fonts: {
Once we have uploaded media to Cloudinary, we receive a bunch of information about the uploaded media, which we then add to the data when we create a Fweet.
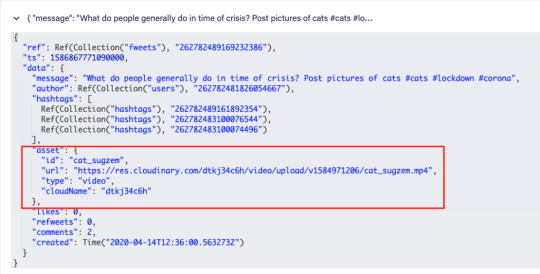
We can then simply use the stored id (which Cloudinary refers to as the publicId) with the Cloudinary React library (in src/components/asset.js):
import { Image, Video, Transformation } from 'cloudinary-react'
To show the image in our feed.
<div className="fweet-asset"> <Image publicId={asset.id} cloudName={cloudName} fetchFormat="auto" quality="auto" secure="true" /> </div>
When you use the id, instead of the direct URL, Cloudinary does a whole range of optimizations to deliver the media in the most optimal format possible. For example when you add a video image as follows:
<div className="fweet-asset"> <Video playsInline autoPlay loop={true} controls={true} cloudName={cloudName} publicId={publicId}> <Transformation width="600" fetchFormat="auto" crop="scale" /> </Video> </div>
Cloudinary will automatically scale down the video to a width of 600 pixels and deliver it as a WebM (VP9) to Chrome browsers (482 KB), an MP4 (HEVC) to Safari browsers (520 KB), or an MP4 (H.264) to browsers that support neither format (821 KB). Cloudinary does these optimizations server-side, significantly improving page load time and the overall user experience.
Retrieving data
We have shown how to add data. Now we still need to retrieve data. Getting the data of our Fwitter feed has many challenges. We need to:
Get fweets from people you follow in a specific order (taking time and popularity into account)
Get the author of the fweet to show his profile image and handle
Get the statistics to show how many likes, refweets and comments it has
Get the comments to list those beneath the fweet.
Get info about whether you already liked, refweeted, or commented on this specific fweet.
If it’s a refweet, get the original fweet.
This kind of query fetches data from many different collections and requires advanced indexing/sorting, but let’s start off simple. How do we get the Fweets? We start off by getting a reference to the Fweets collection using the Collection() function.
Collection('fweets')
And we wrap that in the Documents() function to get all of the collection’s document references.
Documents(Collection('fweets'))
We then Paginate over these references.
Paginate(Documents(Collection('fweets')))
Paginate() requires some explanation. Before calling Paginate(), we had a query that returned a hypothetical set of data. Paginate() actually materializes that data into pages of entities that we can read. FaunaDB requires that we use this Paginate() function to protect us from writing inefficient queries that retrieve every document from a collection, because in a database built for massive scale, that collection could contain millions of documents. Without the safeguard of Paginate(), that could get very expensive!
Let’s save this partial query in a plain JavaScript variable references that we can continue to build on.
const references = Paginate(Documents(Collection('fweets')))
So far, our query only returns a list of references to our Fweets. To get the actual documents, we do exactly what we would do in JavaScript: map over the list with an anonymous function. In FQL, a Lambda is just an anonymous function.
const fweets = Map( references, Lambda(['ref'], Get(Var('ref'))) )
This might seem verbose if you’re used to declarative query languages like SQL that declare what you want and let the database figure out how to get it. In contrast, FQL declares both what you want and how you want it which makes it more procedural. Since you’re the one defining how you want your data, and not the query engine, the price and performance impact of your query is predictable. You can exactly determine how many reads this query costs without executing it, which is a significant advantage if your database contains a huge amount of data and is pay-as-you-go. So there might be a learning curve, but it’s well worth it in the money and hassle it will save you. And once you learn how FQL works, you will find that queries read just like regular code.
Let’s prepare our query to be extended easily by introducing Let. Let will allow us to bind variables and reuse them immediately in the next variable binding, which allows you to structure your query more elegantly.
const fweets = Map( references, Lambda( ['ref'], Let( { fweet: Get(Var('ref')) }, // Just return the fweet for now Var('fweet') ) ) )
Now that we have this structure, getting extra data is easy. So let’s get the author.
const fweets = Map( references, Lambda( ['ref'], Let( { fweet: Get(Var('ref')), author: Get(Select(['data', 'author'], Var('fweet'))) }, { fweet: Var('fweet'), author: Var('user') } ) ) )
Although we did not write a join, we have just joined Users (the author) with the Fweets. We’ll expand on these building blocks even further in a follow up article. Meanwhile, browse src/fauna/queries/fweets.js to view the final query and several more examples.
More in the code base
If you haven’t already, please open the code base for this Fwitter example app. You will find a plethora of well-commented examples we haven’t explored here, but will in future articles. This section touches on a few files we think you should check out.
First, check out the src/fauna/queries/fweets.js file for examples of how to do complex matching and sorting with FaunaDB’s indexes (the indexes are created in src/fauna/setup/fweets.js). We implemented three different access patterns to get Fweets by popularity and time, by handle, and by tag.

Getting Fweets by popularity and time is a particularly interesting access pattern because it actually sorts the Fweets by a sort of decaying popularity based on users’ interactions with each other.
Also, check out src/fauna/queries/search.js, where we’ve implemented autocomplete based on FaunaDB indexes and index bindings to search for authors and tags. Since FaunaDB can index over multiple collections, we can write one index that supports an autocomplete type of search on both Users and Tags.

We’ve implemented these examples because the combination of flexible and powerful indexes with relations is rare for scalable distributed databases. Databases that lack relations and flexible indexes require you to know in advance how your data will be accessed and you will run into problems when your business logic needs to change to accommodate your clients’ evolving use cases.
In FaunaDB, if you did not foresee a specific way that you’d like to access your data, no worries — just add an Index! We have range indexes, term indexes, and composite indexes that can be specified whenever you want without having to code around eventual consistency.
A preview of what’s to come
As mentioned in the introduction, we’re introducing this Fwitter app to demonstrate complex, real-world use cases. That said, a few features are still missing and will be covered in future articles, including streaming, pagination, benchmarks, and a more advanced security model with short-lived tokens, JWT tokens, single sign-on (possibly using a service like Auth0), IP-based rate limiting (with Cloudflare workers), e-mail verification (with a service like SendGrid), and HttpOnly cookies.

The end result will be a stack that relies on services and serverless functions which is very similar to a dynamic JAMstack app, minus the static site generator. Stay tuned for the follow-up articles and make sure to subscribe to the Fauna blog and monitor CSS-Tricks for more FaunaDB-related articles.
The post Rethinking Twitter as a Serverless App appeared first on CSS-Tricks.
Rethinking Twitter as a Serverless App published first on https://deskbysnafu.tumblr.com/
0 notes
Text
Rethinking Twitter as a Serverless App
In a previous article, we showed how to build a GraphQL API with FaunaDB. We’ve also written a series of articles [1, 2, 3, 4] explaining how traditional databases built for global scalability have to adopt eventual (vs. strong) consistency, and/or make compromises on relations and indexing possibilities. FaunaDB is different since it does not make these compromises. It’s built to scale so it can safely serve your future startup no matter how big it gets, without sacrificing relations and consistent data.
In this article, we’re very excited to start bringing all of this together in a real-world app with highly dynamic data in a serverless fashion using React hooks, FaunaDB, and Cloudinary. We will use the Fauna Query Language (FQL) instead of GraphQL and start with a frontend-only approach that directly accesses the serverless database FaunaDB for data storage, authentication, and authorization.

The golden standard for example applications that feature a specific technology is a todo app–mainly because they are simple. Any database out there can serve a very simple application and shine.
And that is exactly why this app will be different! If we truly want to show how FaunaDB excels for real world applications, then we need to build something more advanced.
Introducing Fwitter
When we started at Twitter, databases were bad. When we left, they were still bad
Evan Weaver
Since FaunaDB was developed by ex-Twitter engineers who experienced these limitations first-hand, a Twitter-like application felt like an appropriately sentimental choice. And, since we are building it with FaunaDB, let’s call this serverless baby ‘Fwitter’.
Below is a short video that shows how it looks, and the full source code is available on GitHub.
When you clone the repo and start digging around, you might notice a plethora of well-commented example queries not covered in this article. That’s because we’ll be using Fwitter as our go-to example application in future articles, and building additional features into it with time.
But, for now, here’s a basic rundown of what we’ll cover here:
Modeling the data
Setup the project
Creating the front end
The FaunaDB JavaScript driver
Creating data
Securing your data with UDFs and ABAC roles
How to implement authentication
Adding Cloudinary for media
Retrieving data
More in the code base
We build these features without having to configure operations or set up servers for your database. Since both Cloudinary and FaunaDB are scalable and distributed out-of-the-box, we will never have to worry about setting up servers in multiple regions to achieve low latencies for users in other countries.
Let’s dive in!
Modeling the data
Before we can show how FaunaDB excels at relations, we need to cover the types of relations in our application’s data model. FaunaDB’s data entities are stored in documents, which are then stored in collections–like rows in tables. For example, each user’s details will be represented by a User document stored in a Users collection. And we eventually plan to support both single sign-on and password-based login methods for a single user, each of which will be represented as an Account document in an Accounts collection.
At this point, one user has one account, so it doesn’t matter which entity stores the reference (i.e., the user ID). We could have stored the user ID in either the Account or the User document in a one-to-one relation:

One-to-one
However, since one User will eventually have multiple Accounts (or authentication methods), we’ll have a one-to-many model.

One-to-many
In a one-to-many relation between Users and Accounts, each Account points to only one user, so it makes sense to store the User reference on the Account:
We also have many-to-many relations, like the relations between Fweets and Users, because of the complex ways users interact with each other via likes, comments, and refweets.

Many-to-many
Further, we will use a third collection, Fweetstats, to store information about the interaction between a User and a Fweet.

Fweetstats’ data will help us determine, for example, whether or not to color the icons indicating to the user that he has already liked, commented, or refweeted a Fweet. It also helps us determine what clicking on the heart means: unlike or like.
The final model for the application will look like this:

The application model of the fwitter application
Fweets are the center of the model, because they contain the most important data of the Fweet such as the information about the message, the number of likes, refweets, comments, and the Cloudinary media that was attached. FaunaDB stores this data in a json format that looks like this:
As shown in the model and in this example json, hashtags are stored as a list of references. If we wanted to, we could have stored the complete hashtag json in here, and that is the preferred solution in more limited document-based databases that lack relations. However, that would mean that our hashtags would be duplicated everywhere (as they are in more limited databases) and it would be more difficult to search for hashtags and/or retrieve Fweets for a specific hashtag as shown below.

Note that a Fweet does not contain a link to Comments, but the Comments collection contains a reference to the Fweet. That’s because one Comment belongs to one Fweet, but a Fweet can have many comments–similar to the one-to-many relation between Users and Accounts.
Finally, there is a FollowerStats collection which basically saves information about how much users interact with each other in order to personalize their respective feeds. We won’t cover that much in this article, but you can experiment with the queries in the source code and stay tuned for a future article on advanced indexing.
Hopefully, you’re starting to see why we chose something more complex than a ToDo app. Although Fwitter is nowhere near the complexity of the real Twitter app on which it’s based, it’s already becoming apparent that implementing such an application without relations would be a serious brainbreaker.
Now, if you haven’t already done so from the github repo, it’s finally time to get our project running locally!
Setup the project
To set up the project, go to the FaunaDB dashboard and sign up. Once you are in the dashboard, click on New Database, fill in a name, and click Save. You should now be on the “Overview” page of your new database.
Next, we need a key that we will use in our setup scripts. Click on the Security tab in the left sidebar, then click the New key button.
In the “New key” form, the current database should already be selected. For “Role”, leave it as “Admin”. Optionally, add a key name. Next, click Save and copy the key secret displayed on the next page. It will not be displayed again.
Now that you have your database secret, clone the git repository and follow the readme. We have prepared a few scripts so that you only have to run the following commands to initialize your app, create all collections, and populate your database. The scripts will give you further instructions:
// install node modules npm install // run setup, this will create all the resources in your database // provide the admin key when the script asks for it. // !!! the setup script will give you another key, this is a key // with almost no permissions that you need to place in your .env.local as the // script suggestions npm run setup npm run populate // start the frontend
After the script, your .env.local file should contain the bootstrap key that the script provided you (not the admin key)
REACT_APP_LOCAL___BOOTSTRAP_FAUNADB_KEY=<bootstrap key>
You can optionally create an account with Cloudinary and add your cloudname and a public template (there is a default template called ‘ml_default’ which you can make public) to the environment to include images and videos in the fweets.
REACT_APP_LOCAL___CLOUDINARY_CLOUDNAME=<cloudinary cloudname> REACT_APP_LOCAL___CLOUDINARY_TEMPLATE=<cloudinary template>
Without these variables, the include media button will not work, but the rest of the app should run fine:

Creating the front end
For the frontend, we used Create React App to generate an application, then divided the application into pages and components. Pages are top-level components which have their own URLs. The Login and Register pages speak for themselves. Home is the standard feed of Fweets from the authors we follow; this is the page that we see when we log into our account. And the User and Tag pages show the Fweets for a specific user or tag in reverse chronological order.
We use React Router to direct to these pages depending on the URL, as you can see in the src/app.js file.
<Router> <SessionProvider value=> <Layout> <Switch> <Route exact path="/accounts/login"> <Login /> </Route> <Route exact path="/accounts/register"> <Register /> </Route> <Route path="/users/:authorHandle" component={User} /> <Route path="/tags/:tag" component={Tag} /> <Route path="/"> <Home /> </Route> </Switch> </Layout> </SessionProvider> </Router>
The only other thing to note in the above snippet is the SessionProvider, which is a React context to store the user’s information upon login. We’ll revisit this in the authentication section. For now, it’s enough to know that this gives us access to the Account (and thus User) information from each component.
Take a quick look at the home page (src/pages/home.js) to see how we use a combination of hooks to manage our data. The bulk of our application’s logic is implemented in FaunaDB queries which live in the src/fauna/queries folder. All calls to the database pass through the query-manager, which in a future article, we’ll refactor into serverless function calls. But for now these calls originate from the frontend and we’ll secure the sensitive parts of it with FaunaDB’s ABAC security rules and User Defined Functions (UDF). Since FaunaDB behaves as a token-secured API, we do not have to worry about a limit on the amount of connections as we would in traditional databases.
The FaunaDB JavaScript driver
Next, take a look at the src/fauna/query-manager.js file to see how we connect FaunaDB to our application using FaunaDB’s JavaScript driver, which is just a node module we pulled with `npm install`. As with any node module, we import it into our application as so:
import faunadb from 'faunadb'
And create a client by providing a token.
this.client = new faunadb.Client({ secret: token || this.bootstrapToken })
We’ll cover tokens a little more in the Authentication section. For now, let’s create some data!
Creating data
The logic to create a new Fweet document can be found in the src/fauna/queries/fweets.js file. FaunaDB documents are just like JSON, and each Fweet follows the same basic structure:
const data = { data: { message: message, likes: 0, refweets: 0, comments: 0, created: Now() } }
The Now() function is used to insert the time of the query so that the Fweets in a user’s feed can be sorted chronologically. Note that FaunaDB automatically places timestamps on every database entity for temporal querying. However, the FaunaDB timestamp represents the time the document was last updated, not the time it was created, and the document gets updated every time a Fweet is liked; for our intended sorting order, we need the created time.
Next, we send this data to FaunaDB with the Create() function. By providing Create() with the reference to the Fweets collection using Collection(‘fweets’), we specify where the data needs to go.
const query = Create(Collection('fweets'), data )
We can now wrap this query in a function that takes a message parameter and executes it using client.query() which will send the query to the database. Only when we call client.query() will the query be sent to the database and executed. Before that, we combine as many FQL functions as we want to construct our query.
function createFweet(message, hashtags) { const data = … const query = … return client.query(query) }
Note that we have used plain old JavaScript variables to compose this query and in essence just called functions. Writing FQL is all about function composition; you construct queries by combining small functions into larger expressions. This functional approach has very strong advantages. It allows us to use native language features such as JavaScript variables to compose queries, while also writing higher-order FQL functions that are protected from injection.
For example, in the query below, we add hashtags to the document with a CreateHashtags() function that we’ve defined elsewhere using FQL.
const data = { data: { // ... hashtags: CreateHashtags(tags), likes: 0, // ... }
The way FQL works from within the driver’s host language (in this case, JavaScript) is what makes FQL an eDSL (embedded domain-specific language). Functions like CreateHashtags() behave just like a native FQL function in that they are both just functions that take input. This means that we can easily extend the language with our own functions, like in this open source FQL library from the Fauna community.
It’s also important to notice that we create two entities in two different collections, in one transaction. Thus, if/when things go wrong, there is no risk that the Fweet is created yet the Hashtags are not. In more technical terms, FaunaDB is transactional and consistent whether you run queries over multiple collections or not, a property that is rare in scalable distributed databases.
Next, we need to add the author to the query. First, we can use the Identity() FQL function to return a reference to the currently logged in document. As discussed previously in the data modeling section, that document is of the type Account and is separated from Users to support SSO in a later phase.

Then, we need to wrap Identity() in a Get() to access the full Account document and not just the reference to it.
Get(Identity())
Finally, we wrap all of that in a Select() to select the data.user field from the account document and add it to the data JSON.
const data = { data: { // ... hashtags: CreateHashtags(tags), author: Select(['data', 'user'], Get(Identity())), likes: 0, // ... } }
Now that we’ve constructed the query, let’s pull it all together and call client.query(query) to execute it.
function createFweet(message, hashtags) { const data = { data: { message: message, likes: 0, refweets: 0, comments: 0, author: Select(['data', 'user'], Get(Identity())), hashtags: CreateHashtags(tags), created: Now() } } const query = Create(Collection('fweets'), data ) return client.query(query) }
By using functional composition, you can easily combine all your advanced logic in one query that will be executed in one transaction. Check out the file src/fauna/queries/fweets.js to see the final result which takes even more advantage of function composition to add rate-limiting, etc.
Securing your data with UDFs and ABAC roles
The attentive reader will have some thoughts about security by now. We are essentially creating queries in JavaScript and calling these queries from the frontend. What stops a malicious user from altering these queries?
FaunaDB provides two features that allow us to secure our data: Attribute-Based Access Control (ABAC) and User Defined Functions (UDF). With ABAC, we can control which collections or entities that a specific key or token can access by writing Roles.
With UDFs, we can push FQL statements to the database by using the CreateFunction().
CreateFunction({ name: 'create_fweet', body: <your FQL statement>, })
Once the function is in the database as a UDF, where the application can’t alter it anymore, we then call this UDF from the front end.
client.query( Call(Function('create_fweet'), message, hashTags) )
Since the query is now saved on the database (just like a stored procedure), the user can no longer manipulate it.
One example of how UDFs can be used to secure a call is that we do not pass in the author of the Fweet. The author of the Fweet is derived from the Identity() function instead, which makes it impossible for a user to write a Fweet on someone’s behalf.
Of course, we still have to define that the user has access to call the UDF. For that, we will use a very simple ABAC role that defines a group of role members and their privileges. This role will be named logged_in_role, its membership will include all of the documents in the Accounts collection, and all of these members will be granted the privilege of calling the create_fweet UDF.
CreateRole( name: 'logged_in_role', privileges: [ { resource: q.Function('create_fweet'), actions: { call: true } } ], membership: [{ resource: Collection('accounts') }], )
We now know that these privileges are granted to an account, but how do we ‘become’ an Account? By using the FaunaDB Login() function to authenticate our users as explained in the next section.
How to implement authentication in FaunaDB
We just showed a role that gives Accounts the permissions to call the create_fweets function. But how do we “become” an Account?.
First, we create a new Account document, storing credentials alongside any other data associated with the Account (in this case, the email address and the reference to the User).
return Create(Collection('accounts'), { credentials: { password: password }, data: { email: email, user: Select(['ref'], Var('user')) } }) }
We can then call Login() on the Account reference, which retrieves a token.
Login( Match( < Account reference > , { password: password } ) )
We use this token in the client to impersonate the Account. Since all Accounts are members of the Account collection, this token fulfills the membership requirement of the logged_in_role and is granted access to call the create_fweet UDF.
To bootstrap this whole process, we have two very important roles.
bootstrap_role: can only call the login and register UDFs
logged_in_role: can call other functions such as create_fweet
The token you received when you ran the setup script is essentially a key created with the bootstrap_role. A client is created with that token in src/fauna/query-manager.js which will only be able to register or login. Once we log in, we use the new token returned from Login() to create a new FaunaDB client which now grants access to other UDF functions such as create_fweet. Logging out means we just revert to the bootstrap token. You can see this process in the src/fauna/query-manager.js, along with more complex role examples in the src/fauna/setup/roles.js file.
How to implement the session in React
Previously, in the “Creating the front end” section, we mentioned the SessionProvider component. In React, providers belong to a React Context which is a concept to facilitate data sharing between different components. This is ideal for data such as user information that you need everywhere in your application. By inserting the SessionProvider in the HTML early on, we made sure that each component would have access to it. Now, the only thing a component has to do to access the user details is import the context and use React’s ‘useContext’ hook.
import SessionContext from '../context/session' import React, { useContext } from 'react' // In your component const sessionContext = useContext(SessionContext) const { user } = sessionContext.state
But how does the user end up in the context? When we included the SessionProvider, we passed in a value consisting of the current state and a dispatch function.
const [state, dispatch] = React.useReducer(sessionReducer, { user: null }) // ... <SessionProvider value=>
The state is simply the current state, and the dispatch function is called to modify the context. This dispatch function is actually the core of the context since creating a context only involves calling React.createContext() which will give you access to a Provider and a Consumer.
const SessionContext = React.createContext({}) export const SessionProvider = SessionContext.Provider export const SessionConsumer = SessionContext.Consumer export default SessionContext
We can see that the state and dispatch are extracted from something that React calls a reducer (using React.useReducer), so let’s write a reducer.
export const sessionReducer = (state, action) => { switch (action.type) { case 'login': { return { user: action.data.user } } case 'register': { return { user: action.data.user } } case 'logout': { return { user: null } } default: { throw new Error(`Unhandled action type: ${action.type}`) } } }
This is the logic that allows you to change the context. In essence, it receives an action and decides how to modify the context given that action. In my case, the action is simply a type with a string. We use this context to keep user information, which means that we call it on a successful login with:
sessionContext.dispatch({ type: 'login', data: e })
Adding Cloudinary for media
When we created a Fweet, we did not take into account assets yet. FaunaDB is meant to store application data, not image blobs or video data. However, we can easily store the media on Cloudinary and just keep a link in FaunaDB. The following inserts the Cloudinary script (in app.js):
loadScript('https://widget.cloudinary.com/v2.0/global/all.js')
We then create a Cloudinary Upload Widget (in src/components/uploader.js):
window.cloudinary.createUploadWidget( { cloudName: process.env.REACT_APP_LOCAL___CLOUDINARY_CLOUDNAME, uploadPreset: process.env.REACT_APP_LOCAL___CLOUDINARY_TEMPLATE, }, (error, result) => { // ... } )
As mentioned earlier, you need to provide a Cloudinary cloud name and template in the environment variables (.env.local file) to use this feature. Creating a Cloudinary account is free and once you have an account you can grab the cloud name from the dashboard.

You have the option to use API keys as well to secure uploads. In this case, we upload straight from the front end so the upload uses a public template. To add a template or modify it to make it public, click on the gear icon in the top menu, go to Upload tab, and click Add upload preset.
You could also edit the ml_default template and just make it public.

Now, we just call widget.open() when our media button is clicked.
const handleUploadClick = () => { widget.open() } return ( <div> <FontAwesomeIcon icon={faImage} onClick={handleUploadClick}></FontAwesomeIcon> </div> )
This provides us with a small media button that will open the Cloudinary Upload Widget when it’s clicked.

When we create the widget, we can also provide styles and fonts to give it the look and feel of our own application as we did above (in src/components/uploader.js):
const widget = window.cloudinary.createUploadWidget( { cloudName: process.env.REACT_APP_LOCAL___CLOUDINARY_CLOUDNAME, uploadPreset: process.env.REACT_APP_LOCAL___CLOUDINARY_TEMPLATE, styles: { palette: { window: '#E5E8EB', windowBorder: '#4A4A4A', tabIcon: '#000000', // ... }, fonts: {
Once we have uploaded media to Cloudinary, we receive a bunch of information about the uploaded media, which we then add to the data when we create a Fweet.

We can then simply use the stored id (which Cloudinary refers to as the publicId) with the Cloudinary React library (in src/components/asset.js):
import { Image, Video, Transformation } from 'cloudinary-react'
To show the image in our feed.
<div className="fweet-asset"> <Image publicId={asset.id} cloudName={cloudName} fetchFormat="auto" quality="auto" secure="true" /> </div>
When you use the id, instead of the direct URL, Cloudinary does a whole range of optimizations to deliver the media in the most optimal format possible. For example when you add a video image as follows:
<div className="fweet-asset"> <Video playsInline autoPlay loop={true} controls={true} cloudName={cloudName} publicId={publicId}> <Transformation width="600" fetchFormat="auto" crop="scale" /> </Video> </div>
Cloudinary will automatically scale down the video to a width of 600 pixels and deliver it as a WebM (VP9) to Chrome browsers (482 KB), an MP4 (HEVC) to Safari browsers (520 KB), or an MP4 (H.264) to browsers that support neither format (821 KB). Cloudinary does these optimizations server-side, significantly improving page load time and the overall user experience.
Retrieving data
We have shown how to add data. Now we still need to retrieve data. Getting the data of our Fwitter feed has many challenges. We need to:
Get fweets from people you follow in a specific order (taking time and popularity into account)
Get the author of the fweet to show his profile image and handle
Get the statistics to show how many likes, refweets and comments it has
Get the comments to list those beneath the fweet.
Get info about whether you already liked, refweeted, or commented on this specific fweet.
If it’s a refweet, get the original fweet.
This kind of query fetches data from many different collections and requires advanced indexing/sorting, but let’s start off simple. How do we get the Fweets? We start off by getting a reference to the Fweets collection using the Collection() function.
Collection('fweets')
And we wrap that in the Documents() function to get all of the collection’s document references.
Documents(Collection('fweets'))
We then Paginate over these references.
Paginate(Documents(Collection('fweets')))
Paginate() requires some explanation. Before calling Paginate(), we had a query that returned a hypothetical set of data. Paginate() actually materializes that data into pages of entities that we can read. FaunaDB requires that we use this Paginate() function to protect us from writing inefficient queries that retrieve every document from a collection, because in a database built for massive scale, that collection could contain millions of documents. Without the safeguard of Paginate(), that could get very expensive!
Let’s save this partial query in a plain JavaScript variable references that we can continue to build on.
const references = Paginate(Documents(Collection('fweets')))
So far, our query only returns a list of references to our Fweets. To get the actual documents, we do exactly what we would do in JavaScript: map over the list with an anonymous function. In FQL, a Lambda is just an anonymous function.
const fweets = Map( references, Lambda(['ref'], Get(Var('ref'))) )
This might seem verbose if you’re used to declarative query languages like SQL that declare what you want and let the database figure out how to get it. In contrast, FQL declares both what you want and how you want it which makes it more procedural. Since you’re the one defining how you want your data, and not the query engine, the price and performance impact of your query is predictable. You can exactly determine how many reads this query costs without executing it, which is a significant advantage if your database contains a huge amount of data and is pay-as-you-go. So there might be a learning curve, but it’s well worth it in the money and hassle it will save you. And once you learn how FQL works, you will find that queries read just like regular code.
Let’s prepare our query to be extended easily by introducing Let. Let will allow us to bind variables and reuse them immediately in the next variable binding, which allows you to structure your query more elegantly.
const fweets = Map( references, Lambda( ['ref'], Let( { fweet: Get(Var('ref')) }, // Just return the fweet for now Var('fweet') ) ) )
Now that we have this structure, getting extra data is easy. So let’s get the author.
const fweets = Map( references, Lambda( ['ref'], Let( { fweet: Get(Var('ref')), author: Get(Select(['data', 'author'], Var('fweet'))) }, { fweet: Var('fweet'), author: Var('user') } ) ) )
Although we did not write a join, we have just joined Users (the author) with the Fweets. We’ll expand on these building blocks even further in a follow up article. Meanwhile, browse src/fauna/queries/fweets.js to view the final query and several more examples.
More in the code base
If you haven’t already, please open the code base for this Fwitter example app. You will find a plethora of well-commented examples we haven’t explored here, but will in future articles. This section touches on a few files we think you should check out.
First, check out the src/fauna/queries/fweets.js file for examples of how to do complex matching and sorting with FaunaDB’s indexes (the indexes are created in src/fauna/setup/fweets.js). We implemented three different access patterns to get Fweets by popularity and time, by handle, and by tag.
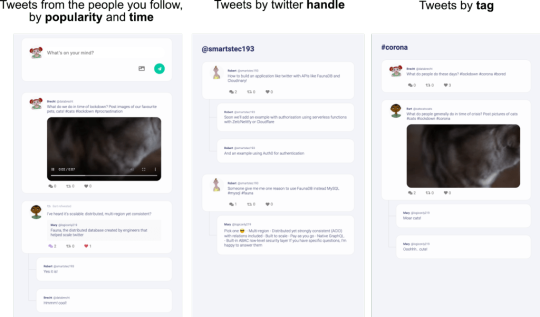
Getting Fweets by popularity and time is a particularly interesting access pattern because it actually sorts the Fweets by a sort of decaying popularity based on users’ interactions with each other.
Also, check out src/fauna/queries/search.js, where we’ve implemented autocomplete based on FaunaDB indexes and index bindings to search for authors and tags. Since FaunaDB can index over multiple collections, we can write one index that supports an autocomplete type of search on both Users and Tags.
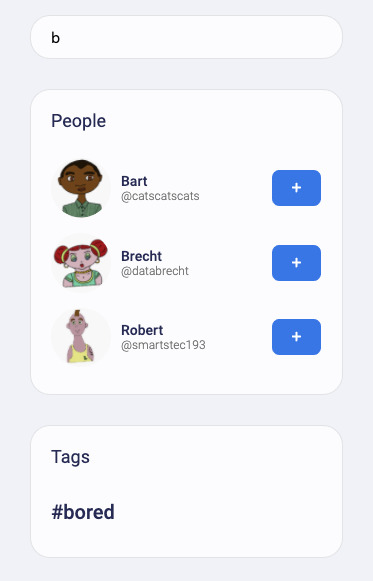
We’ve implemented these examples because the combination of flexible and powerful indexes with relations is rare for scalable distributed databases. Databases that lack relations and flexible indexes require you to know in advance how your data will be accessed and you will run into problems when your business logic needs to change to accommodate your clients’ evolving use cases.
In FaunaDB, if you did not foresee a specific way that you’d like to access your data, no worries — just add an Index! We have range indexes, term indexes, and composite indexes that can be specified whenever you want without having to code around eventual consistency.
A preview of what’s to come
As mentioned in the introduction, we’re introducing this Fwitter app to demonstrate complex, real-world use cases. That said, a few features are still missing and will be covered in future articles, including streaming, pagination, benchmarks, and a more advanced security model with short-lived tokens, JWT tokens, single sign-on (possibly using a service like Auth0), IP-based rate limiting (with Cloudflare workers), e-mail verification (with a service like SendGrid), and HttpOnly cookies.

The end result will be a stack that relies on services and serverless functions which is very similar to a dynamic JAMstack app, minus the static site generator. Stay tuned for the follow-up articles and make sure to subscribe to the Fauna blog and monitor CSS-Tricks for more FaunaDB-related articles.
The post Rethinking Twitter as a Serverless App appeared first on CSS-Tricks.
source https://css-tricks.com/rethinking-twitter-as-a-serverless-app/
from WordPress https://ift.tt/3ayHZkF via IFTTT
0 notes
Text
How to add a dropdownlist that’s dynamically populated from database to each row in datatable gridview
So I’ve created a fully functional gridview that has the two last columns as dropdownlists that are populated from the database and they read/write from it. But I needed to implement search unto the gridview so I used the Datatables.net plugin, It works perfectly but as soon as I add the drop down lists, the search is disabled. Unless I add them through javascript and I’m not nearly experienced enough in that field to accomplish that on my own.
Before I switched to the datatable plug in, I used to just append the dropdownlists I needed at the Rowdatabound event of the gridview, How can I achieve something similar through javascript ?
This is the java script code :
var TableContent = "<tr>"; if (!$("#req").length) $("body").append("<table id='req'></table>"); else $('#req').prepend($('<thead>').append($('.add_ADU'))); var colns = [ { "data": "Request_ID", title: "ID", }, { "data": "Student_ID", visible:true }, { "data": "Type", visible:true }, { "data": "Description", visible:true }, { "data": "Language", visible:true }, { "data": "PUC", visible:true }, { "data": "Quantity", title: "Quantity" }, { "data": "Comments", title: "Comments" }, { "data": "Fees", title: "Fees" }, { "data": "Date", title: "Date" }, { "data": "Payment_Status", title: "Payment Status" }, { "data": "Payment_Date", title: "Payment Date" }, { "data": "Student_Name", title: "Student Name", visible:true }, { "data": "Payment_ID",title:"Payment ID", title: "Phone" }, { "data": "Addressed_To",title: "Addressed To", visible:true }, { "data": "username", title:"Assigned To",visible:true }, { "data": "status", title:"Status",visible:true } ]; var table = $('#req').DataTable({ select: true, "columns": colns, "order": [[ 12, "desc" ]], "initComplete": function (settings, json) { reset_table_page_length($(window).height()); }, }); $("#req tr").append( '<select id="assign"' + '<option value="Paid">him</option>' + '<option value="NotPaid">her</option>' + '</select>' ) $("#req_filter").prepend( '<select id="inp-sel-status-fltr" class="table-toolbar-inp">' + '<option value="Paid">Paid</option>' + '<option value="NotPaid">Not Paid</option>'+ '</select>' ) $("#inp-sel-status-fltr").change(function myfunction() { filter_table_by_status($(this).val()); }); function filter_table_by_status(val) { table.column(10).search(val); table.draw(); }
As pathetic as it is, this is how far I’ve gotten to achieving what I’m trying to :
$("#req tr").append( '<select id="assign"' + '<option value="Paid">him</option>' + '<option value="NotPaid">her</option>' + '</select>')
This is the HTML code for the gridview :
<div class="container"> <asp:GridView BorderWidth="0" CssClass="stripe compact order-column row-border" runat="server" AutoGenerateColumns="true" ID="req" OnRowDataBound="req_RowDataBound" ClientIDMode="Static" Style="width: 100% !important"> <HeaderStyle CssClass="add_ADU" /> </asp:GridView>
and in the code behind I would just append the dropdownlists and then query the data I needed and populate them with it using this code:
protected void req_RowDataBound(object sender, GridViewRowEventArgs e) { if (e.Row.RowType == DataControlRowType.DataRow) { DataTable table = new DataTable(); var openCloseddl = e.Row.FindControl("openCloseddl") as DropDownList; var assignddl = e.Row.FindControl("assignToddl") as DropDownList; assignddl.DataMember = "username"; assignddl.DataValueField = "username"; assignddl.DataSource = table; //get the values of the conditions that define which staff var request_id = e.Row.Cells[0].Text; var type = e.Row.Cells[3].Text; var description = e.Row.Cells[4].Text; var puc = e.Row.Cells[6].Text; var quantity = e.Row.Cells[7].Text; //fetch which staff member it's assigned to if exists. SqlConnection conn = new SqlConnection(System.Configuration.ConfigurationManager.ConnectionStrings["studentOrderUpload"].ConnectionString); SqlCommand comm = new SqlCommand("SELECT username from request_status WHERE request_id = @request_id and type = @type and description = @description and puc = @puc and quantity = @quantity", conn); comm.Parameters.AddWithValue("@request_id", request_id); comm.Parameters.AddWithValue("@type", type); comm.Parameters.AddWithValue("@description", description); comm.Parameters.AddWithValue("@puc", puc); comm.Parameters.AddWithValue("@quantity", quantity); try { conn.Open(); object result = comm.ExecuteScalar(); string resultText = (result == null ? "" : result.ToString()); conn.Close(); //if it's not assigned to anyone, show every staff member. if (resultText == "") { if (type.ToLower().Contains("customized")) { SqlCommand cmd1 = new SqlCommand("select username from staff where type = 'customized'", conn); conn.Open(); SqlDataAdapter ad1 = new SqlDataAdapter(cmd1); ad1.Fill(table); conn.Close(); assignddl.DataBind(); assignddl.SelectedValue = "Scholarship"; if (openCloseddl.SelectedValue == "Open") { openCloseddl.Enabled = true; } assignddl.Items.RemoveAt(1); } else { SqlCommand cmd1 = new SqlCommand("select username from staff where type ='standard'", conn); conn.Open(); SqlDataAdapter ad1 = new SqlDataAdapter(cmd1); ad1.Fill(table); conn.Close(); assignddl.DataBind(); } assignddl.Items.Insert(0, new ListItem("Select User")); openCloseddl.Enabled = false; if (openCloseddl.SelectedValue == "Open" && type.ToLower().Contains("customized")) { openCloseddl.Enabled = true; } } //if it's assigned to someone, show only the assigned staff, else { if (type.ToLower().Contains("customized")) { SqlCommand cmd1 = new SqlCommand("select username from staff where type = 'customized'", conn); conn.Open(); SqlDataAdapter ad1 = new SqlDataAdapter(cmd1); ad1.Fill(table); conn.Close(); assignddl.DataBind(); assignddl.SelectedValue = "Scholarship"; if (openCloseddl.SelectedValue == "Open") { openCloseddl.Enabled = true; } assignddl.Items.RemoveAt(1); } else { SqlCommand cmd1 = new SqlCommand("select username from staff where type = 'standard'", conn); conn.Open(); SqlDataAdapter ad1 = new SqlDataAdapter(cmd1); ad1.Fill(table); conn.Close(); assignddl.DataBind(); assignddl.SelectedValue = resultText; } } if (openCloseddl != null) { SqlCommand comm1 = new SqlCommand("SELECT status from request_status WHERE request_id = @request_id and type = @type and description = @description and puc = @puc and quantity = @quantity", conn); comm1.Parameters.AddWithValue("@request_id", request_id); comm1.Parameters.AddWithValue("@type", type); comm1.Parameters.AddWithValue("@description", description); comm1.Parameters.AddWithValue("@puc", puc); comm1.Parameters.AddWithValue("@quantity", quantity); conn.Open(); object result1 = comm1.ExecuteScalar(); conn.Close(); if (result1.ToString() == "Closed") { openCloseddl.SelectedValue = "Closed"; openCloseddl.Enabled = false; assignddl.Enabled = false; if ((HttpContext.Current.User.Identity.Name.Equals("DocRequestAdmin"))) { assignddl.Enabled = true; openCloseddl.Enabled = true; } } } } catch (Exception ee) { var error = ee.Message; conn.Close(); } var paid = e.Row.Cells[12].Text; if (paid.Contains("Not")) { assignddl.SelectedValue = "Select User"; assignddl.Enabled = false; openCloseddl.Enabled = false; } } }
Which is irrelevant at this point I believe, since I’m trying to do this through javascript.
This is a screenshot of what the grid looks like, the dropdown lists I want to add should exist in the last two columns “Assigned To” and “Status”

1 Answer
There is a built in render function in data tables which you can call in your columns objects. The function accepts 3 arguments, the first one is the value of the property which you specified in your “data” property, and the third will return the value of the whole underlying object.
You can read about it here.
For example:
{ "data": "username", title:"Assigned To", visible:true, render: function(data, type, row) { //do sth here } }
In the above render function, the data parameter will return the value of the “username” property, and the row parameter will return the value of all properties of the underlying object.
You can use the data provided by the row parameter to append a value and an id to your dropdown list. If your row parameter returns an array of objects, you can do a for loop to iterate and append every value to the select element.
Archive from: https://stackoverflow.com/questions/59015626/how-to-add-a-dropdownlist-thats-dynamically-populated-from-database-to-each-row
from https://knowledgewiki.org/how-to-add-a-dropdownlist-thats-dynamically-populated-from-database-to-each-row-in-datatable-gridview/
0 notes